

 Check the
documentation
Check the
documentation Ask the
Community
Ask the
Community Take a look
at
Academy
Take a look
at
Academy Cognite
Status
Page
Cognite
Status
Page Contact
Cognite Support
Contact
Cognite Support

Overview
The Quickstart Deployment Pack (QS DP) is a package of multiple deployment packs and modules, including Entity Matching, File Annotation, and the Quickstart Enterprise Data Model, together with foundational modules and synthetic data under sourcesystem modules for end-to-end testing.
QS DP functions as a fixed, integrated setup bundled with necessary modules (e.g., ingestion, file annotation, entity matching, Quickstart DM). Modifying or cherry-picking modules within the QS DP package is not supported. However, if you require a customized setup, all constituent modules are available independently and can be selected via the cdf modules init or cdf modules add commands.
What's included
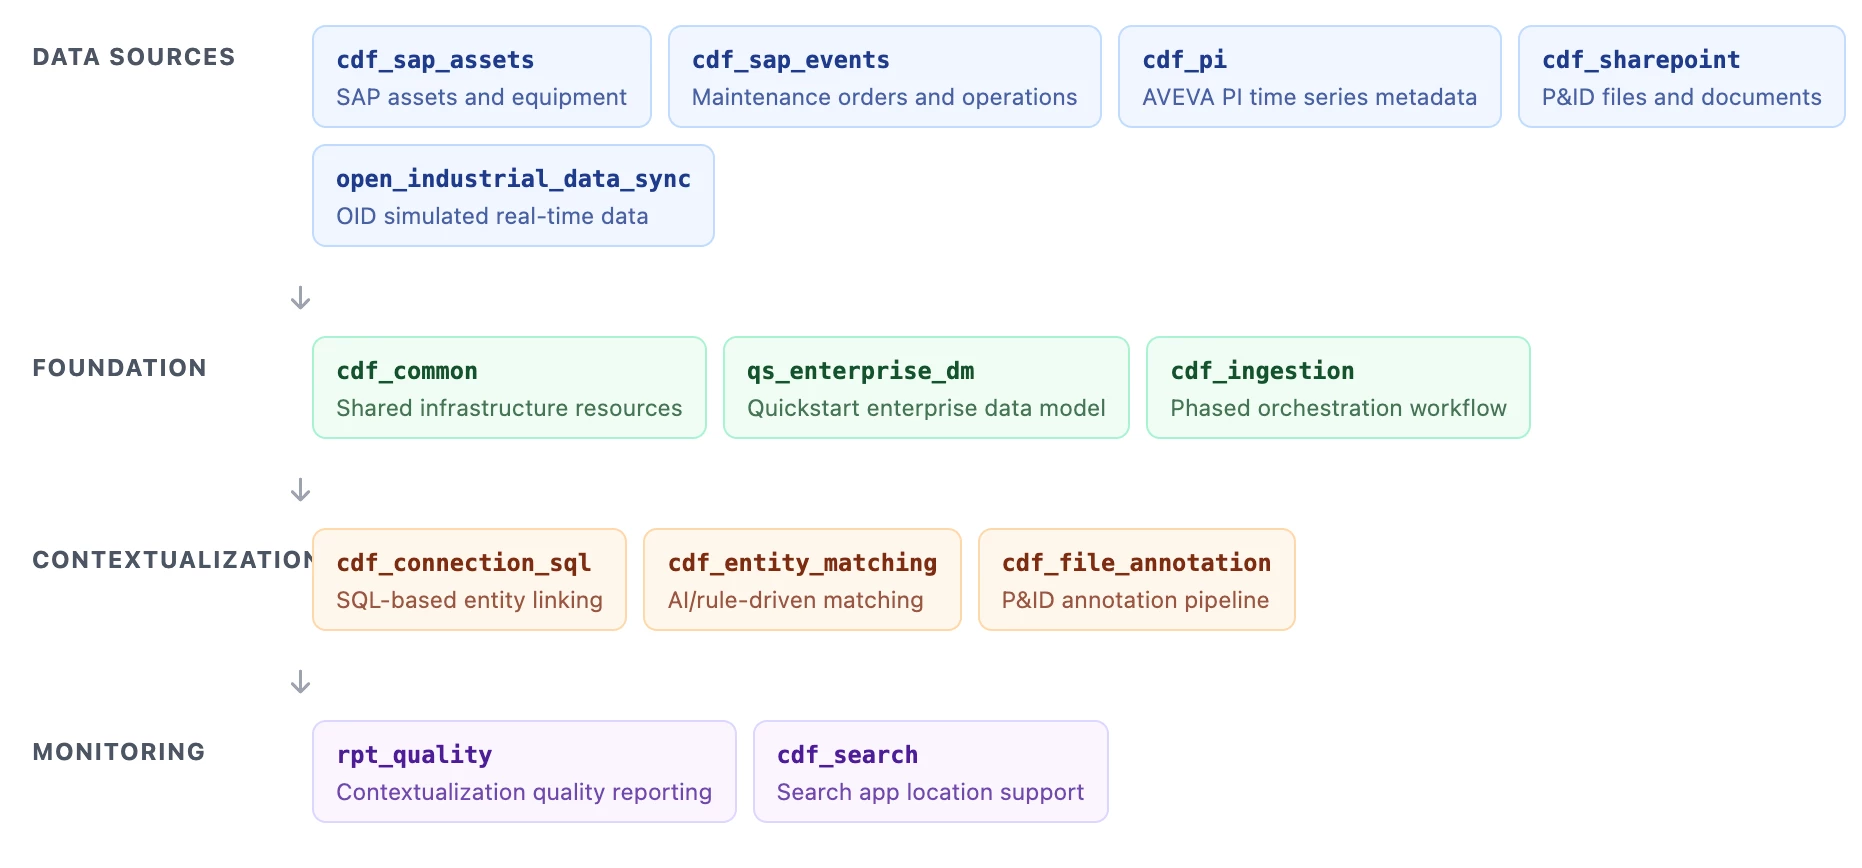
QS DP bundles integrated modules across source ingestion, foundation, contextualization, and monitoring so you can run a full data-to-context pipeline in a predictable sequence.
Foundation modules
| Module | Purpose |
|---|---|
cdf_common | Creates shared spaces, datasets, RAW databases, and relation-writer runtime resources used by downstream modules. |
qs_enterprise_dm | Deploys the Quickstart enterprise model (containers, views, and spaces). Module guide: How to get Started with Quick Start Enterprise Data Model. |
cdf_ingestion | Runs staged workflows for data population first, then contextualization. |
Source system modules + synthetic data
| Module | Purpose |
|---|---|
cdf_sap_assets | Ingests and transforms SAP functional locations and equipment. |
cdf_sap_events | Ingests maintenance notifications, orders, and operations. |
cdf_pi | Creates time series entities and metadata from PI inputs. |
cdf_sharepoint | Loads files for annotation, including P&IDs used in testing. |
open_industrial_data_sync | Replays time-shifted OID data to simulate continuous updates. |
Contextualization modules
| Module | Purpose |
|---|---|
cdf_connection_sql | Links entities using deterministic SQL and tag-based mapping logic. |
cdf_entity_matching | Matches time series and assets using rule-based and ML-assisted methods. Module guide: How To: CDF Entity Matching Module. |
cdf_file_annotation | Runs prepare, launch, finalize, and promote steps for file annotations. Add module-specific guide link here when available. |
Monitoring and tooling modules
| Module | Purpose |
|---|---|
rpt_quality | Computes contextualization KPIs and stores rates for monitoring trends. |
cdf_search | Provides location and search structures for Industrial Tools experiences. |
Prerequisites
Before you start, ensure the following are configured:
- Toolkit setup complete with cognite-toolkit version 0.7.33 or later. Follow setup instructions.
cdf.tomlexists in your project root. If missing, runcdf initand choose Create toml file (required).- Valid authentication is configured and verified using
cdf auth initandcdf auth verify. See Toolkit authentication docs. - Data plugin is enabled in
cdf.toml:[plugins]
data = true - Library source is configured in
cdf.toml:[library.cognite]
url = "https://github.com/cognitedata/library/releases/download/latest/packages.zip"
Getting Started
Recommended: use a clean project folder or commit your current changes before module initialization.
Step 1: Initialize and select the Quickstart modules
Run:
cdf modules init . --clean
Warning:
--cleancan overwrite existing module folders.
From the interactive module list, select Quickstart Deployment Pack (or select individual modules as needed).
Step 2: Verify generated structure
modules/
├── accelerators/
│   ├── cdf_common/
│   ├── cdf_ingestion/
│   ├── contextualization/
│   │   ├── cdf_file_annotation/
│   │   ├── cdf_entity_matching/
│   │   └── cdf_connection_sql/
│   ├── industrial_tools/cdf_search/
│   └── open_industrial_data_sync/
├── sourcesystem/
│   ├── cdf_pi/
│   ├── cdf_sap_assets/
│   ├── cdf_sap_events/
│   └── cdf_sharepoint/
├── dashboards/rpt_quality/
└── models/qs_enterprise_dm/
Step 3: Update required configuration
Update config.<env>.yaml and related environment variables before building/deploying.
- Set
<my-project-env>to your CDF project name for the target environment. -
Add the following variables to your
.envfile:-
GROUP_SOURCE_ID: The Object ID of your IDP group. For instructions on configuring this, refer to the IDP Group Setup Documentation. -
OPEN_ID_CLIENT_SECRET: Log in to the OID Hub Page and click Create client secret to generate this value.
-
- Under
cdf_entity_matching, update:targetViewFilterValues:root:WMTtoroot:ast_VALtargetViewSearchProperty:nametoaliasesAssetViewExternalId:YourOrgAssettoAssetTimeSeriesViewExternalId:YourOrgTimeSeriestoEnterprise_TimeSeriestargetViewExternalId:YourOrgAssettoAssetentityViewExternalId:YourOrgTimeSeriestoEnterprise_TimeSeries
- In
cdf_file_annotation, setApplicationOwnerto owner email(s).
Important: Keep client IDs and secrets as environment variables, not hardcoded in config files.
Important: Review cron expressions; placeholders may be set to February 29 and should be updated.
Step 4: Enable FILE_ANNOTATION mode in SAP asset transformation
Open modules/sourcesystem/cdf_sap_assets/transformations/population/asset.Transformation.sql and:
- Comment out COMMON MODE
- Uncomment FILE_ANNOTATION MODE
This mode sets external IDs as ast_<id>, creates root ast_VAL, and populates aliases/tags needed for diagram detection.
Testing the Quickstart Package
QS DP includes synthetic data under source-system modules, allowing you to test ingestion, annotation, and contextualization without live integrations.
-
Build and deploy resources:
cdf build
cdf deploy --dry-run
cdf deploy
Expected warning example: non-resource directories like
upload_dataincdf_pi. -
Upload synthetic data (data plugin):
cdf data upload dir modules/sourcesystem/cdf_pi/upload_data
cdf data upload dir modules/sourcesystem/cdf_sap_assets/upload_data
cdf data upload dir modules/sourcesystem/cdf_sap_events/upload_data
cdf data upload dir modules/sourcesystem/cdf_sharepoint/upload_data
cdf data upload dir modules/accelerators/contextualization/cdf_entity_matching/upload_data
cdf data upload dir modules/accelerators/contextualization/cdf_file_annotation/upload_data
If project verification is enforced in toolkit latest versions. It is recommended to do project verification but if you are working in test environment and want to skip project name verification, use
--skip-verify-cdf-projectwith each upload command.- If your modules directory is under organization directory, prepend organization directory name to each path.
- If database/table names change in config, update corresponding names in each
upload_data/Manifest.yaml.
Verify uploads in Integrate > Staging in CDF.
-
Trigger workflows in order (Data Workflows UI):
ingestion: populate the data model and create baseline relationships.wf_file_annotation: annotate uploaded files and create links to entities.EntityMatching: execute matching and metadata updates.
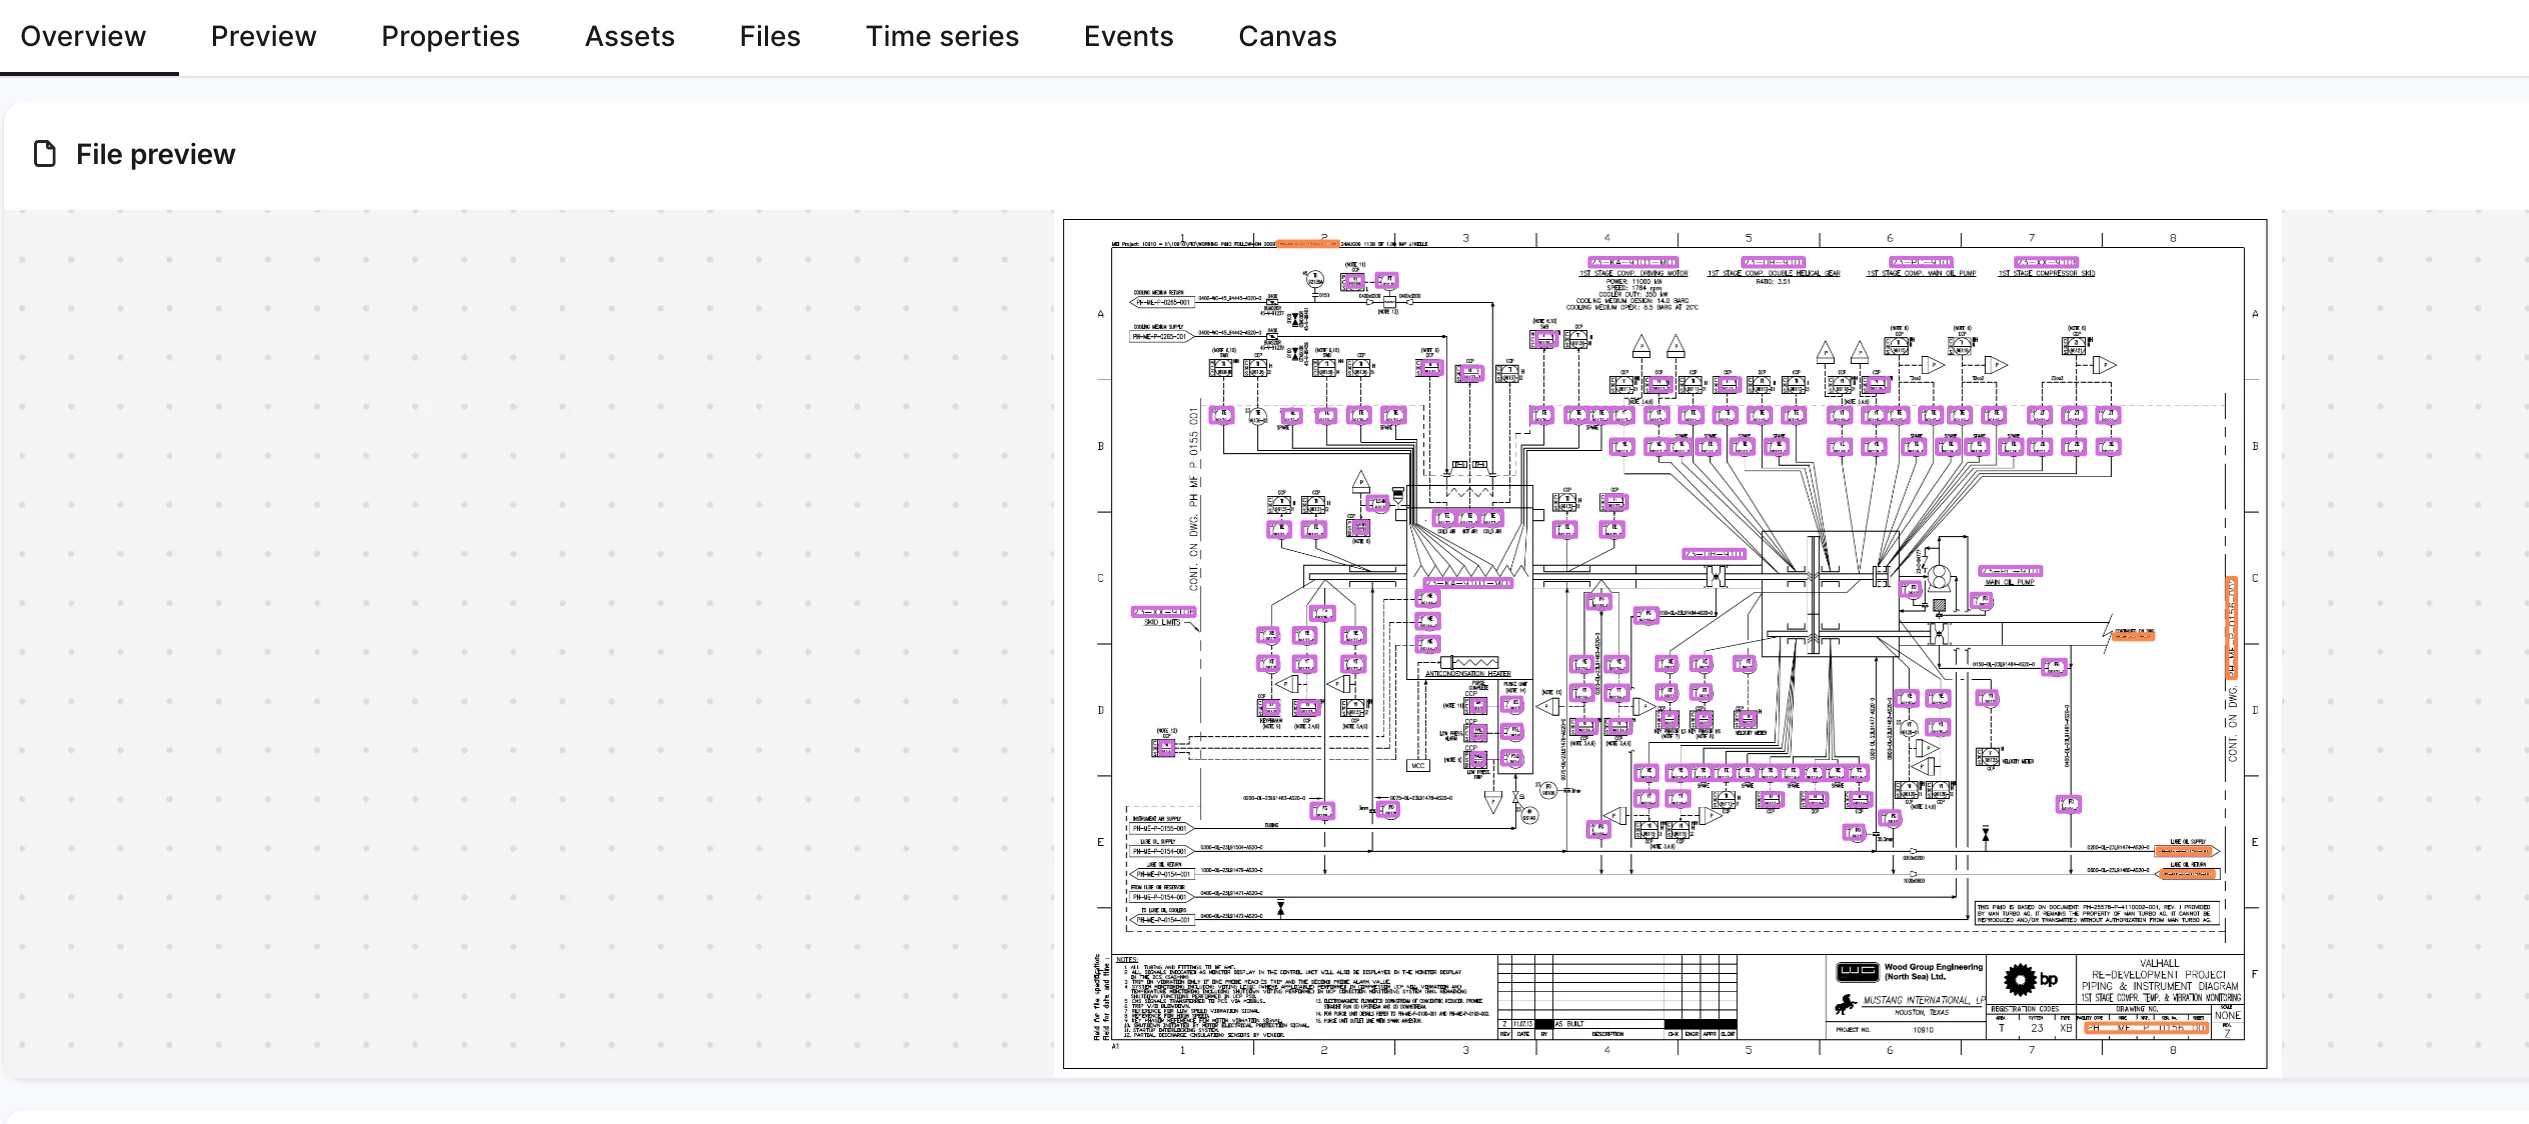
Test files are available in
sourcesystem/cdf_sharepoint/files/.
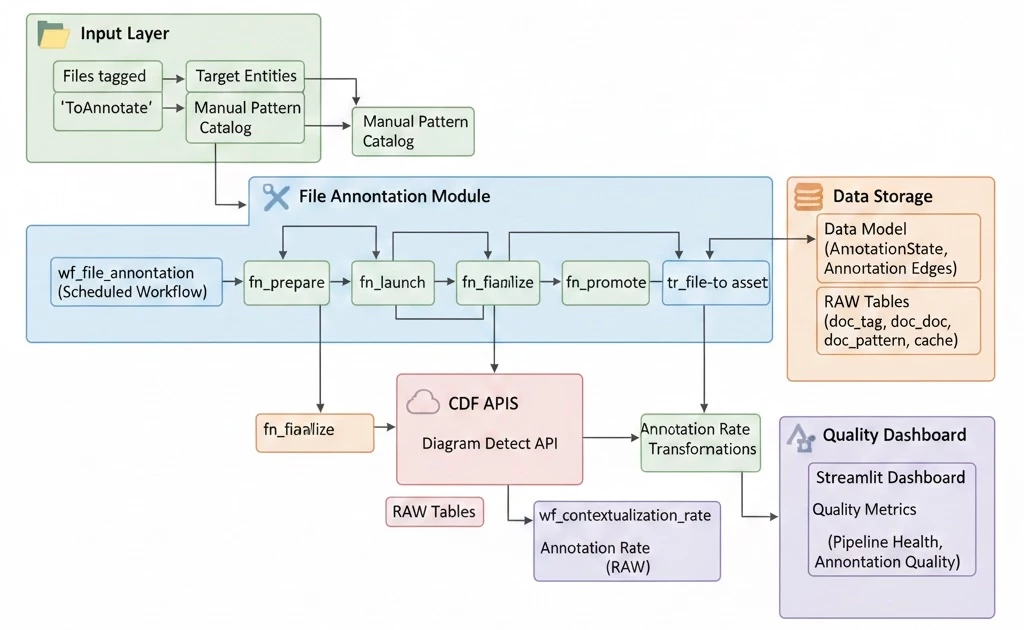
File Annotation flow overview (prepare -> launch -> finalize -> promote)
Post-Deployment Verification & Monitoring
-
Verify file annotations: Open Industrial Tools > Search App > Files and confirm uploaded P&IDs have linked assets.
-
Validate entity matching output: Review function run logs for
dm:context:timeseries:entity_matching. -
Monitor ingestion and workflow health: Confirm successful runs in the Data Workflows UI.
-
Analyze contextualization KPIs: Run
wf_contextualization_rate, then reviewtbl_contextualization_rate_reportindb_quality_reports. -
Trend reporting: Use the RAW output for CDF Charts, Grafana, or Power BI dashboards.
Support
- Refer to Cognite documentation for Toolkit and deployment guidance.
- Contact your Cognite support team for environment-specific issues.
- For deployment pack questions, use Slack channel #topic-deployment-packs.