

 Check the
documentation
Check the
documentation Ask the
Community
Ask the
Community Take a look
at
Academy
Take a look
at
Academy Cognite
Status
Page
Cognite
Status
Page Contact
Cognite Support
Contact
Cognite Support


This how-to article describes an example deployment pack for entity matching in Cognite Data Fusion (CDF). The provided code and configuration demonstrate how to match entities—such as time series, 3D nodes, and other entity types—to assets and tags using a scalable, production-ready approach.
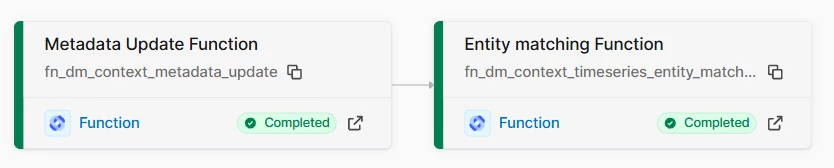
The process operates entirely on CDF Data Modeling objects and uses CDF Workflows to orchestrate two core functions:
-
A metadata and alias enrichment step that updates or creates descriptions, tags, and aliases for entities and assets.
-
A matching step that uses these aliases and metadata to automatically establish relationships between entities and assets.
The result of running the workflow is enriched metadata (aliases, tags, and descriptions) for time series and other entities, along with direct relationships between entities (for example, time series) and assets or tags.
Note: Screenshots and diagrams are illustrative. Automatically generated content may not reflect actual project data.

Why Use This Module?
Accelerate Time Series Contextualization with Production-Proven Code
Building an entity matching solution from scratch is complex and time-consuming. This module provides production-ready, battle-tested code that has been successfully deployed across multiple customer environments. It enables you to save weeks or months of development time while delivering enterprise-grade performance, reliability, and scalability.
Key Benefits
-
⚡ Production-proven: Based on real-world implementations running in multiple customer production environments.
-
🚀 Significant time savings: Deploy in hours instead of spending weeks or months developing custom matching logic.
-
📊 Proven performance: 35–55% faster execution compared to legacy implementations, with 40–60% improved matching accuracy.
-
🔧 Easy to extend: Clean, modular architecture with well-documented functions makes customization straightforward.
-
📈 Enterprise scale: Processes 10,000+ time series per batch out of the box, with proven scalability for large industrial deployments.
-
🎯 Multi-method matching: Combines rule-based matching, AI-powered entity matching, and manual expert mappings in a unified solution.
-
🛡️ Robust error handling: Achieves a 95%+ success rate through retries, state management, and incremental processing.
Time and Cost Savings
-
Development: Save 4–8 weeks by leveraging proven, production-ready code.
-
Performance optimization: Benefit from built-in performance improvements without months of tuning.
-
Maintenance: Reduce ongoing maintenance through stable, well-tested components.
-
Accuracy: Improve matching quality and reduce manual correction effort.
-
Iteration speed: Rapidly adapt rules and algorithms to domain-specific requirements.
Real-World Performance Metrics
-
Processing speed: 35–55% faster than legacy implementations
-
Memory efficiency: 30–50% reduction in memory usage
-
Matching accuracy: 40–60% improvement over basic approaches
-
Batch capacity: 10,000+ time series per batch
-
Cache efficiency: 70%+ cache hit rate for metadata operations
Whether you are contextualizing hundreds or tens of thousands of time series, this module provides a scalable foundation proven in production environments. Start with the default configuration for immediate value, then customize matching rules and algorithms as needed.
Key Features of the Process
The Entity Matching module delivers comprehensive contextualization capabilities in CDF by combining advanced matching algorithms with metadata optimization and workflow automation.
Overview
The module is designed to:
-
Support manual expert mappings for complex or domain-specific relationships
-
Perform rule-based matching using regular expressions and business logic
-
Leverage AI-powered entity matching using CDF’s built-in ML capabilities
-
Optimize metadata to improve searchability and contextualization
-
Scale efficiently using batch processing and performance monitoring
-
Integrate seamlessly with CDF Workflows for scheduling and orchestration
-
Maintain state for incremental processing and reliable error recovery

Core Functions
Time Series Entity Matching Function
Purpose: Matches time series to assets using advanced matching techniques.
Key Features:
-
Manual mapping support for expert-defined relationships
-
Rule-based matching using regex patterns and configurable logic
-
AI-powered entity matching for pattern discovery
-
Optimized performance with batch processing and caching
-
Retry logic and robust error handling
-
Detailed metrics and logging for monitoring and troubleshooting
Typical Use Cases:
-
Expert-driven mapping of complex asset relationships
-
Automatic contextualization of sensor data
-
Discovery of asset–time series relationships
-
Industrial IoT data organization
-
Operational monitoring and process optimization
Metadata Update Function
Purpose: Enriches and optimizes metadata for time series and assets to improve matching quality and searchability.
Key Features:
-
Optimized batch processing with caching
-
Discipline classification using NORSOK standards
-
Memory-efficient processing with automatic cleanup
-
Detailed performance benchmarking
-
Comprehensive logging and error handling
Typical Use Cases:
-
Metadata enrichment for improved search
-
Discipline-based asset categorization
-
Data quality improvements
-
Search and discovery optimization
Getting Started / Deployment (Cognite Toolkit)
Prerequisites
Before you start, ensure you have:
- A Cognite Toolkit project set up locally
- Your project contains the standard cdf.toml file
- Valid authentication to your target CDF environment
- Access to a CDF project and credentials
- cognite-toolkit >= 0.7.33
- enable data plugin in cdf.toml file
Step 1: Enable External Libraries
Edit your project's cdf.toml and add:
[plugins]
dump = false
dev = false
data = true

[library.cognite]

url = "https://github.com/cognitedata/library/releases/download/latest/packages.zip"
checksum = "sha256:795a1d303af6994cff10656057238e7634ebbe1cac1a5962a5c654038a88b078"
This allows the Toolkit to retrieve official library packages.
Step 2 (Optional but Recommended): Enable Usage Tracking
To help improve the Deployment Pack:
cdf collect opt-in
Step 3: Add the Module
Run:
cdf modules init . --clean
⚠️ Disclaimer: This command will overwrite existing modules. Commit changes before running, or use a fresh directory.
This opens the interactive module selection interface.
Step 4: Select the Entity Matching Package (NOTE: use Space bar to select module)
From the menu, select (Note, select using space bar):
Contextualization: Module templates for data contextualization
  └── Contextualization Entity Matching
Step 5: Verify Folder Structure
After installation, your project should now contain:
modules
     └── accelerators
         └── contextualization
             └── cdf_entity_matching
If you want to add more modules, continue with yes ('y') else no ('N')
And continue with creation, yes ('Y') => this then creates a folder structure in your destination with all the files from your selected modules.
Step 6: Deploy to CDF
NOTE: Update your config.dev.yaml file with project, source_id, clisen ID/Secret and changes in spaces or versions.
Optional: Rename variables LOC and SOURCE. (or just test with default values)
Build deployment structure:
cdf build
Optional dry run:
cdf deploy --dry-run
Deploy module to your CDF project
cdf deploy
- Note that the deployment uses a set of CDF capabilities, so you might need to add this to the CDF security group used by Toolkit to deploy
After deploy, data under upload_data directory needs to be populated in the respective tables. This will be done using data upload command.
cdf data upload dir .\modules\accelerators\contextualization\cdf_entity_matching\upload_data\ -v- Note that data plugin should be enabled in cdf.toml file for running this command.
Testing the Entity Matching module
If you wan to test the entity matching process, it is possible to download test data from the included source data in CDF Toolkit.
The process to do this would be:
- In your local cdf.toml file :
[library.cognite]
url = "https://github.com/cognitedata/toolkit-data/releases/download/latest/packages.zip"
- Before you run cdf modules init . note the the local folder structure will be updated lost with the now content from the modules you now download (so copy/store or run the init of the annotation module again after setting up the test data)
cdf modules init . --clean - Select package:
- Models: Example of Minimum Extension of the Cognite Process Industry Model
- Select Yes to add more modules, and select:
- SourceSystem: Module templates for setting up a data pipeline from a source system
- And then (Note, select using space bar)
- SAP Asset data
- OSIsoft/Aveva PI
After installation, your project should now contain:
     modules
     ├── models
     │   └── cdf_process_industry_extension
     └── sourcesystem
         ├── cdf_pi
         └── cdf_sap_assets
If you want to add more modules, continue with yes ('y') else no ('N')
And continue with creation, yes ('Y') => this then creates a folder structure in your destination with all the files from your selected modules.
- Edit your config.dev.yaml file
- Project è should be your CDF project name
- For cdf_pi and cdf_sap_assets (details on access control see CDF documentation) :
- groupSourceId: if using Azure, access group ID from Entra ID used by system user and/or users setting up CDF that should be able update data model and run Transformations
- workflowClientId: environment variable with Entra ID object ID for APP
- workflowClientSecret: environment variable with secret value for APP
Build deployment structure:
cdf build
Optional dry run:
cdf deploy --dry-run
Deploy module to your CDF project
cdf deploy
After deploy, data under upload_data directory needs to be populated in the respective tables. This will be done using data upload command.
cdf data upload dir .\modules\accelerators\contextualization\cdf_entity_matching\upload_data\ -v
⚠️ NOTE: Before running workflow that upload Assets/ Tags and creates hierarchy – make sure your transformation: Asset Transformations for SAP Springfield S/4HANA Assets don’t filter on ‘1157’ - making sure that all Assets are loaded to data model!
Run workflows to load data
- sap_s4ana_population:
- aveva_pi_population
You should now have test data to run a simple example of the annotation process :-)
Run the Entity Matching workflow
If your module structure was overwritten by the models for test data, clean up, merge or just run the module init again as instructed above for the entity matching module. This to make it easy to make changes and redeploy when you are making the Entity Matching process relevant for your project.
After deployment, trigger the workflow click on Run) :EntityMatching process via the CDF Workflows UI or API to execute the transformations in order.
In Integrate / Data Workflows: Entity Matching process
In CDF UI: Build Solutions / Functions
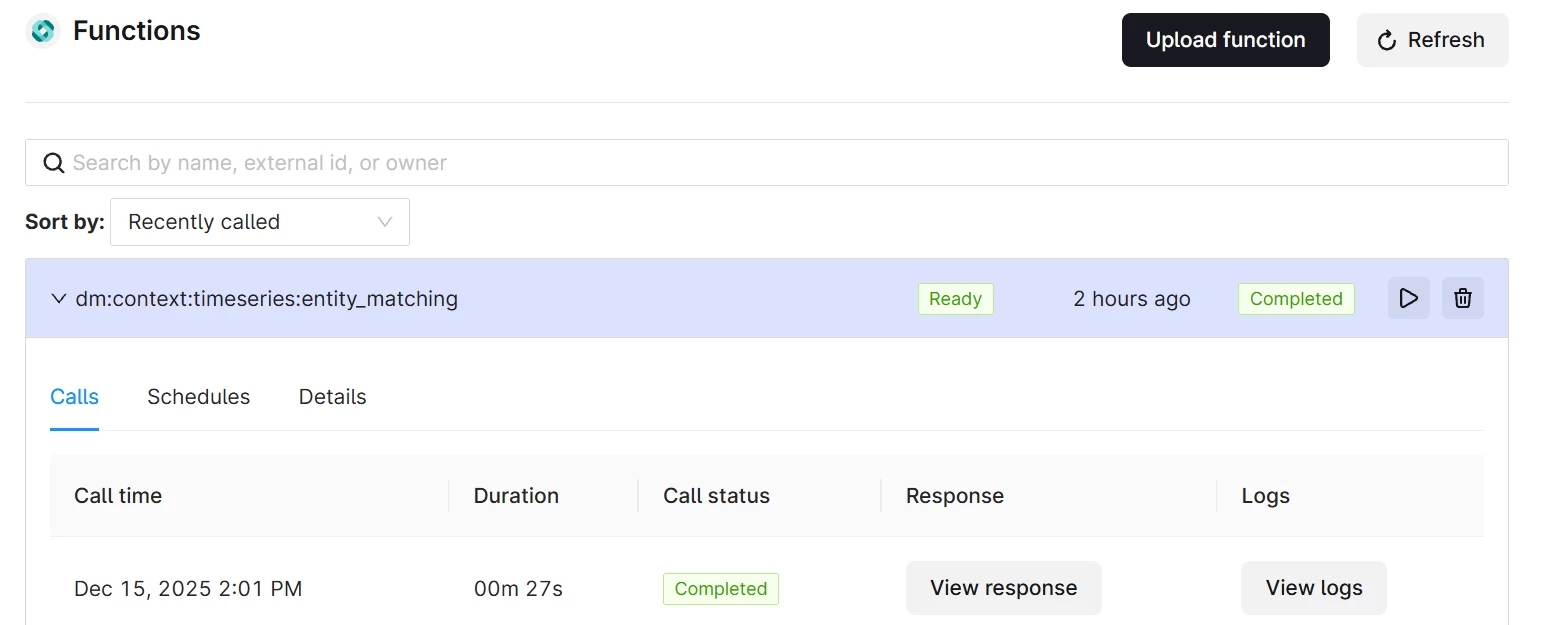
Click on View logs and verify that the included test data fwhere processed without any errors.
You can also view the result in the good/bad tables in RAW – or by using search and look at the mapping from Asset to Time series, ex:

Data Flow

