

 Check the
documentation
Check the
documentation Ask the
Community
Ask the
Community Take a look
at
Academy
Take a look
at
Academy Cognite
Status
Page
Cognite
Status
Page Contact
Cognite Support
Contact
Cognite Support

Overview
The Quickstart Deployment Pack (DP) is a comprehensive solution designed to bootstrap a Cognite Data Fusion (CDF) project with a robust, production-ready foundation. It provides a curated set of modules that handle everything from infrastructure setup and data modeling to data ingestion, contextualization, and quality reporting.
This guide explains how to install, configure, and use the Quickstart DP to accelerate your industrial digital twin development.
The Quickstart DP consists of several integrated modules. Below is a detailed guide to each major component.
1. CDF Common Module
Purpose: Establishes the foundational infrastructure required by all other modules. It ensures consistency across environments by provisioning shared resources.
Key Components:
-
Data Spaces: Provisions dedicated spaces for data instances (
demo.Space) and function execution (functions.Space). -
Datasets: Creates the
demo.DataSetused to organize transformations, functions, and workflows. -
RAW Databases: Sets up
source.DataBasefor raw ingestion andcontextualization_state.DataBasefor tracking process states. -
Direct Relation Writer Function: A specialized CDF Function that converts approved annotations into permanent direct relations in the data model.
-
Extraction Pipeline: Manages the configuration for the relation writer job, including mappings between file annotations and target entities.
2. QS Enterprise Data Model Module
Purpose: Provides a comprehensive enterprise data model that extends the standard Cognite Data Model (CDM) with organization-specific views and containers, offering complete coverage for process industry use cases including 3D visualization, work management, and asset hierarchy.
Key Components:
-
Containers: Define the physical storage for 38+ entity types including Assets, Equipment, TimeSeries, WorkOrders, CAD/PointCloud/360Image models, Maintenance Orders, Notifications, and more.
-
Views: Provide a queryable interface for all entity types, extending CDM base types (e.g., CogniteAsset, CogniteEquipment) with custom enterprise views (e.g., Asset, Equipment, Enterprise_TimeSeries).
- Spaces: Three dedicated spaces for data organization:
- Schema Space (sp_enterprise_process_industry): Stores all data model definitions
- Enterprise Instance Space (sp_enterprise_instance): Stores enterprise-wide instance data
- Site Instance Space (sp_site_instance): Stores site-specific instance data
- Quickstart Enterprise Data Model: A unified schema (
ORGProcessIndustries) combining all CDM interfaces and custom enterprise views into a single queryable model.
- Enterprise Search Data Model: An optimized search model (
ORGProcessIndustriesSearch) with a subset of views tailored for search functionality across Assets, Equipment, TimeSeries, Files, and WorkOrders.
3. CDF Ingestion Module
Purpose: Orchestrates the entire data population and contextualization lifecycle through automated workflows.
Key Components:
-
Ingestion Workflow: A multi-phase orchestrator that runs transformations in the correct dependency order (for example, ensuring Assets exist before linking TimeSeries to them).
-
Auth Groups: Define specific security permissions for users and service accounts to execute automated runs safely.
-
Phase 1 (Population): Tasks that move data from RAW tables into the Data Model for entities like assets, equipment, and files.
-
Phase 2 (Contextualization): Tasks that create relationships between the populated entities.
4. Source System Modules (SAP & PI)
Purpose: Handle the initial ingestion of master data and time-series metadata into CDF.
SAP Assets Components:
-
Population Transformations: SQL logic that transforms SAP functional locations and equipment into the CDF Data Model.
-
Connection Transformation: Links equipment to their parent assets based on the SAP hierarchy.
PI (TimeSeries) Components:
-
Population Transformation: Converts PI tag metadata into TimeSeries instances and extracts asset tags from naming conventions into the
sysTagsFoundproperty. -
Extraction Pipeline: Manages the configuration for PI data extractors.
5. CDF Connection SQL Module
Purpose: Automates relationship creation using declarative SQL logic based on tag matching.
Key Components:
-
TimeSeries to Asset/Equipment: SQL transformations that match
sysTagsFoundon TimeSeries to the names of Assets or Equipment. -
Maintenance Order to Asset: Links work orders to physical assets by scanning order metadata for asset tags.
-
Activity to TimeSeries: Connects work activities to specific data streams via pattern matching.
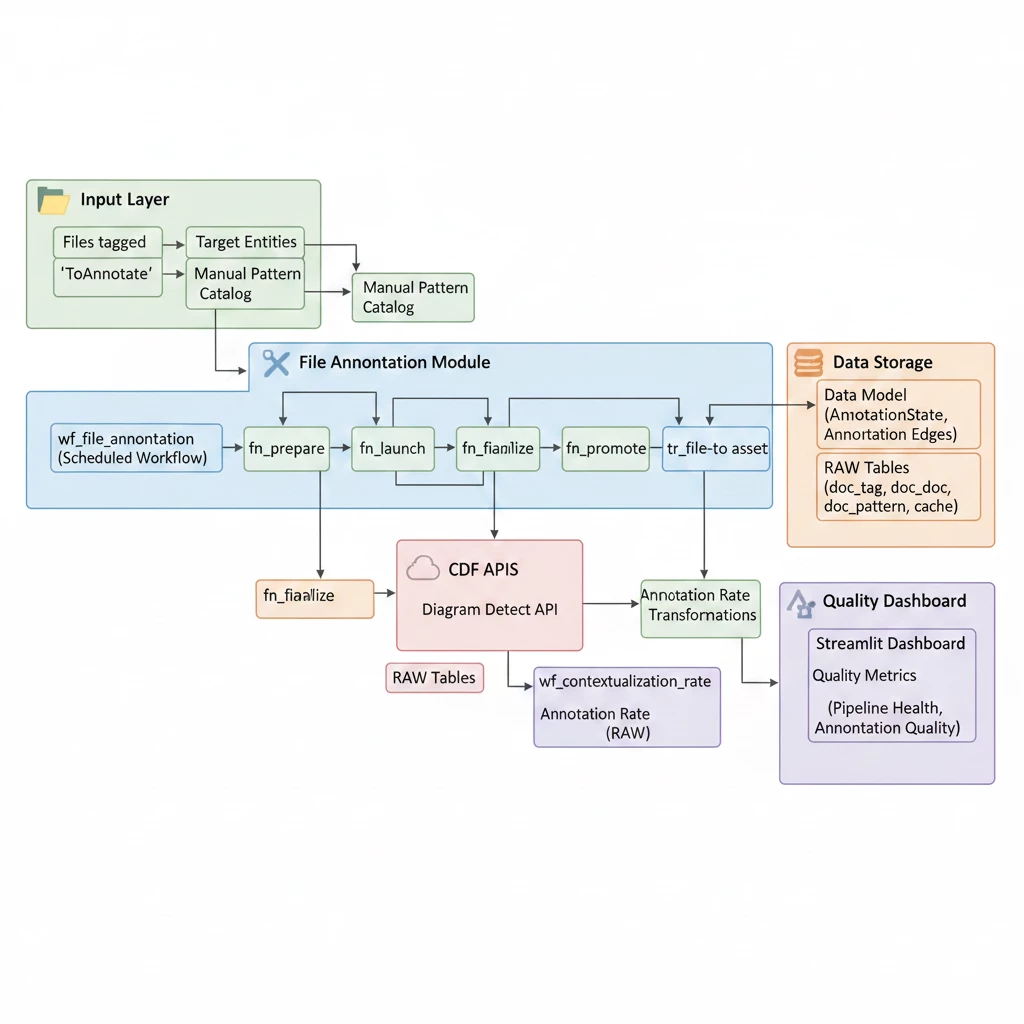
6. CDF File Annotation Module
Purpose: An advanced framework for automating the identification and linking of entities within documents (such as P&IDs).
Key Components:
-
Prepare Function: Identifies new or reset files that require annotation.
-
Launch Function: Groups files by site and submits jobs to the Cognite Diagram Detect API.
-
Finalize Function: Processes API results, applies confidence thresholds, and creates edges in the data model.
-
Promote Function: Automatically resolves “pattern-mode” annotations (for example, text matches) by finding the correct entity in the data model.
-
Link Assets: Transformation to directly link the files with annotated assets.
-
Annotation Workflow: Orchestrates the sequence of the four functions above.
7. CDF Entity Matching Module
Purpose: Provides AI-powered and rule-based matching to link TimeSeries data to Assets.
Key Components:
-
Entity Matching Function: Combines regex rules, expert manual mappings, and machine learning to associate sensors with equipment.
-
Metadata Update Function: Optimizes and enriches entity metadata (such as NORSOK discipline classification) to improve searchability.
-
Annotation Workflow: Triggers matching and metadata updates as new data arrives.
8. Open Industrial Data (OID) Sync Module
Purpose: Simulates real-time industrial data by fetching historical data from a public project and time-shifting it to the present.
Key Components:
-
OID Sync Function: Fetches historical data, applies a time offset (for example, +1 week), and inserts it into the target project.
-
Smart Backfill Strategy: A logic gate that ensures all TimeSeries get real-time updates while progressively backfilling 12 weeks of history.
-
Scheduled Trigger: Automatically runs the sync every 10 minutes.
9. CDF Quality Reports Module
Purpose: Provides automated monitoring and governance of the contextualization process.
Key Components:
-
Quality Transformations: A suite of SQL scripts that calculate “link rates” (the percentage of entities successfully connected) across various types.
-
Contextualization Rate Workflow: Runs all quality reports in sequence to generate a unified snapshot of data health.
-
Report Table: A dedicated RAW table that stores historical metrics for trend analysis and gap identification.
Prerequisites
Before you start, ensure you have the following:
- You already have a Cognite Toolkit project set up locally.
- Your project contains the standard
cdf.tomlfile. - You have valid authentication to your target CDF environment.
- cognite-toolkit >= 0.7.33.
- The data plugin enabled in your
cdf.tomlfile.
Getting Started
Follow the steps below to get started with the Quickstart Deployment Pack. Recommended to start with a new project or clean project.
Step 1: Enable External Libraries
Edit your project’s cdf.toml and add:
[alpha_flags]
external-libraries = true
[library.cognite]
url = "https://github.com/cognitedata/library/releases/download/latest/packages.zip"
checksum = "sha256:f73006968f1fc6d7e02cd7021b11ef67d5a682c0849268165268d5572e7fefee"
This allows the Toolkit to retrieve official library packages, including the Quickstart DP package.
📝 Note: Replacing the Default Library
By default, a Cognite Toolkit project contains a
[library.toolkit-data]section pointing tohttps://github.com/cognitedata/toolkit-data/....These two library sections cannot coexist. To use this Deployment Pack, you must replace the
toolkit-datasection withlibrary.cognite:
[library.toolkit-data][library.cognite]github.com/cognitedata/toolkit-data/...github.com/cognitedata/library/...The
library.cognitepackage includes all Deployment Packs developed by the Value Delivery Accelerator team (RMDM, RCA agents, Context Quality Dashboard, etc.).
⚠️ Checksum Warning
When running
cdf modules add, you may see a warning like:WARNING [HIGH]: The provided checksum sha256:... does not match downloaded file hash sha256:...
Please verify the checksum with the source and update cdf.toml if needed.
This may indicate that the package content has changed.This is expected behavior. The checksum in this documentation may be outdated because it gets updated with every release. The package will still download successfully despite the warning.
To resolve the warning: Copy the new checksum value shown in the warning message and update your
cdf.tomlwith it. For example, if the warning showssha256:da2b33d60c66700f..., update your config to:[library.cognite]
url = "https://github.com/cognitedata/library/releases/download/latest/packages.zip"
checksum = "sha256:da2b33d60c66700f..."
Step 2: Add the Module
Run:
cdf modules init . --clean
⚠️ Disclaimer: This command will overwrite existing modules. Commit changes before running, or use a fresh directory.
This opens the interactive module selection interface.
Step 3: Select the Quickstart Deployment Pack
From the menu, select:
Quickstart Deployment Pack: Quickstart deployment pack for CDF help you showcase CDF capabilities in a quick and easy way.
Step 4: Verify Folder Structure
After installation, your project should contain:
     modules
     ├── accelerators
     │   ├── cdf_common
     │   ├── cdf_ingestion
     │   ├── contextualization
     │   │   ├── cdf_file_annotation
     │   │   ├── cdf_entity_matching
     │   │   └── cdf_connection_sql
     │   ├── industrial_tools
     │   │   └── cdf_search
     │   └── open_industrial_data_sync
     ├── sourcesystem
     │   ├── cdf_pi
     │   ├── cdf_sap_assets
     │   ├── cdf_sap_events
     │   └── cdf_sharepoint
     ├── dashboards
     │   └── rpt_quality
     └── models
         └── qs_enterprise_dm
If you want to add more modules, continue with yes (Y); otherwise choose no (N).
Proceed with creation (Y) to generate the folder structure and files for your selected modules.
Step 5: Update the Configuration File
Once the files are available, update the configuration files config.<env>.yaml for any variables that are not set. Environment variables must also be updated with Client ID and Client Secret values for different data sources such as Aveva PI, SAP, etc., which can be found under the sourcesystem module’s variable declarations. As of for now the Client ID and Client Secret values for these sources are using IDP_CLIENT_ID and IDP_CLIENT_SECRET.
Update the following variables in the configuration file:
-
<my-project-env>Replace with your CDF project name for that environment. -
<GROUP_SOURCE_ID>Replace with your designated Group Object ID. For testing, you can use your TK service principal group’s SourceId, but this is not recommended for production. -
<RUN_WORKFLOW_USER_ID>Replace with your email address or a user who can trigger workflows. -
OPEN_ID_CLIENT_SECRETYou can get this from the hub page on Open Industrial Data (OID). -
Update following variable under the cdf_entity_matching module:
-
AssetFilterValuesfrom root:WMT to root:ast_VAL -
AssetSearchPropertyfrom name to aliases
-
⚠️ Note: It is strongly recommended to keep Client IDs and Client Secrets as environment variables rather than in your configuration files. By default, these variables are read from the
.envfile and will cause build or deploy errors if missing.
Step 6: Enable File Annotation mode in Asset Transformation
In transformation file asset.Transformation.sql which can be found under modules > sourcesystem > cdf_sap_assets > transformations > population, there are two modes - COMMON MODE and FILE_ANNOTATION MODE. Uncomment the FILE_ANNOTATION MODE and comment out the COMMON MODE. The FILE_ANNOTATION MODE uses ast_<id> format for external IDs, creates a root asset ast_VAL (representing the Valhall platform), and sets the top-level asset to have ast_VAL as its parent while other assets reference their ancestor via WMT_TAG_ID_ANCESTOR. This mode also populates the aliases property with name variations and the tags property with 'DetectInDiagrams' for assets having two or more dashes in their name, enabling diagram detection matching.
Testing the Quickstart Package
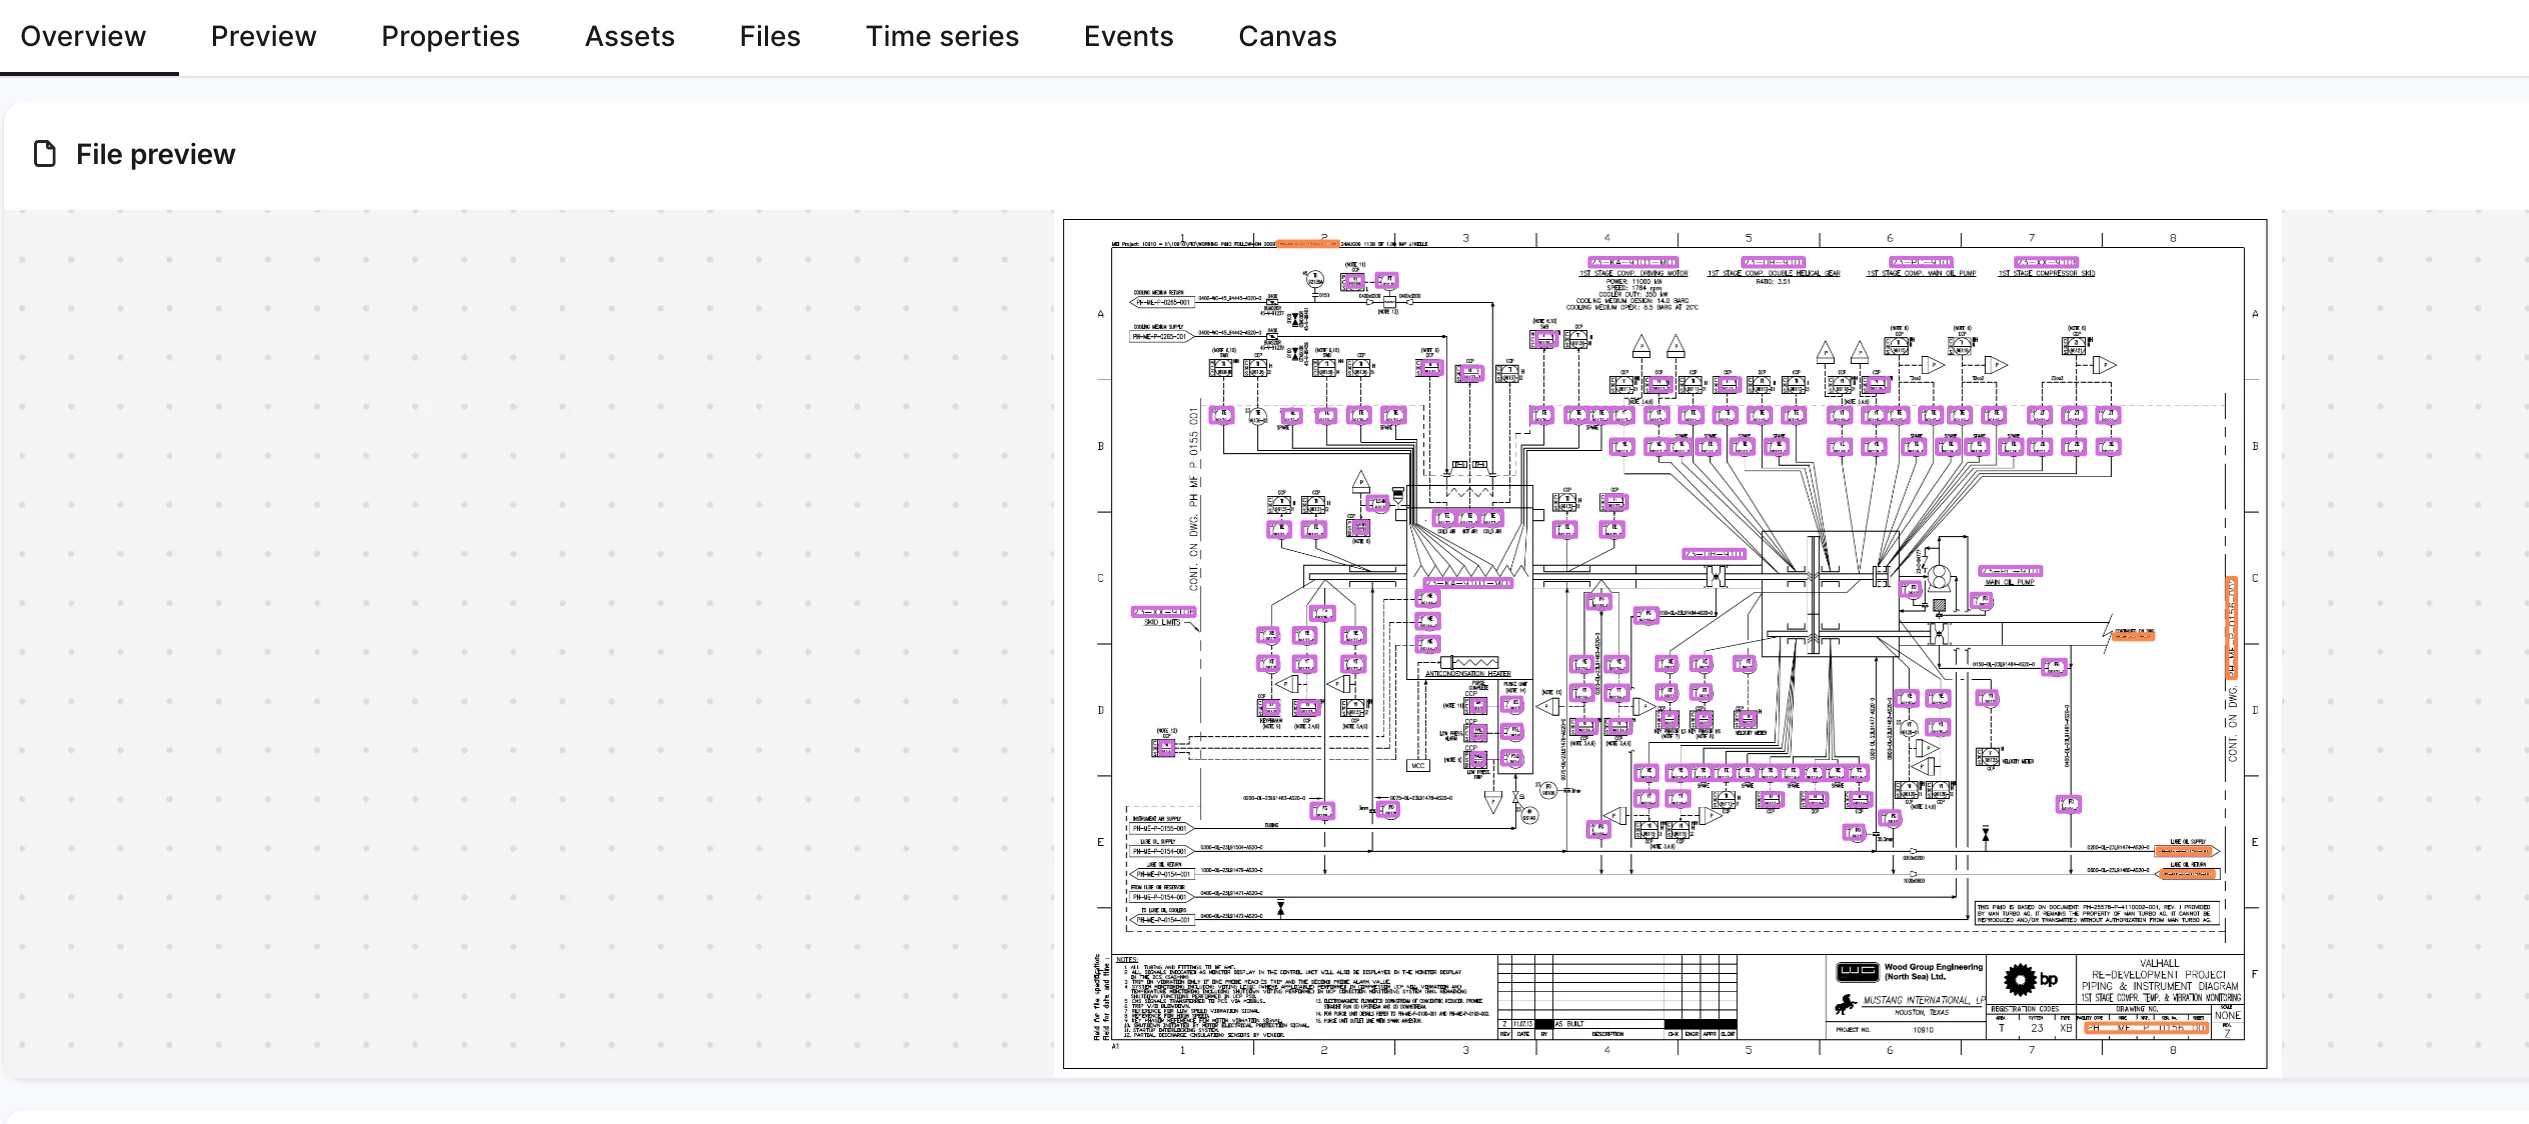
The Quickstart Deployment Pack includes test data in the sourcesystem module. Using this data, you can quickly deploy and test the Quickstart modules. The result will be P&ID files being annotated, and contextualization rates can be checked in the deployed Streamlit app.
- Update the
creatorfield inmodules/accelerators/contextualization/cdf_file_annotation/streamlit/file_annotation_dashboard.Streamlit.yamlwith your Email ID.
-
Deploy to CDF:
-
Populate variables in resource YAML files from the configuration file by running
cdf build. If warnings appear, resolve them and rebuild using the same command.⚠️ Note: Ignore warnings such as
WARNING [LOW]: Module 'cdf_pi' has non-resource directories: ['upload_data']... -
Optionally dry-run the deployment using
cdf deploy --dry-runto validate everything before deploying to your CDF instance.
-
Deploy to your CDF instance using
cdf deploy.
-
-
Uploading data through
cdf deployin Toolkit will be deprecated in version 0.8 and later. The new Deployment Pack supports this change, and all synthetic data is stored under theupload_datadirectory in the respective modules. The new way to upload data is using the data plugin’suploadcommand.-
In your cdf.toml file, verify that the data plugin is enabled:
[plugins]
data = true -
Run the following commands to upload the synthetic data:
cdf data upload dir modules/sourcesystem/cdf_pi/upload_data
cdf data upload dir modules/sourcesystem/cdf_sap_assets/upload_data
cdf data upload dir modules/sourcesystem/cdf_sap_events/upload_data
cdf data upload dir modules/sourcesystem/cdf_sharepoint/upload_data
cdf data upload dir modules/accelerators/contextualization/cdf_entity_matching/upload_data
cdf data upload dir modules/accelerators/contextualization/cdf_file_annotation/upload_data
Verify the data upload in Integrate > Staging in CDF.
⚠️ Note:
- These
upload_datadirectories containManifest.yamlfiles with hardcoded table and database names. If you change table or database names in the configuration file, update the correspondingManifest.yamlfiles as well. - If you are maintaining your modules under the organization directory, then add the organization directory name to the start of the
upload_datadirectory path.
- These
-
- Once data is uploaded, trigger the following workflow files in this order from the Data Workflows UI in CDF:
- ingestion to populate the data model and build connections between assets, equipment, work orders, etc.
- wf_file_annotation to annotate uploaded files. Test files are located in the
sourcesystem/cdf_sharepoint/files/directory and can be viewed in your Industrial Tools Search App. - EntityMatching to run the entity matching workflow. Results can be found in the
dm:context:timeseries:entity_matchingfunction’s run logs. - wf_contextualization_rate to check file annotation. This populates tables in the
db_file_annotationdatabase. You can review annotation coverage in the files within the Search App (Industrial Tools) or in theFile Annotation Dashboardunder Custom Apps (Industrial Tools).
Support
For troubleshooting or deployment issues:
-
Refer to the Cognite Documentation
-
Contact your Cognite support team
-
For any queries related to the deployment pack, write to us on our slack channel #topic-deployment-packs.
