

 Check the
documentation
Check the
documentation Ask the
Community
Ask the
Community Take a look
at
Academy
Take a look
at
Academy Cognite
Status
Page
Cognite
Status
Page Contact
Cognite Support
Contact
Cognite Support

This article is intended for customers that are planning to migrate, or are in the process of migrating, to Cognite Data Fusion’s (CDF) new authentication system which will be based on Open ID Connect (OIDC). It will cover in detail all aspects of this migration process, and hopefully help making this migration process as simple as possible.
What is OIDC?
OpenID Connect is an industry-standard protocol supported by many popular identity providers (IdP), such as Azure Active Directory (Azure AD), Microsoft's cloud-based identity and access management service.
For more information about OIDC, please visit the official website.
What are the benefits of using OIDC over CDF’s legacy authentication?
The greatest benefit of using OIDC over CDF’s legacy authentication, is that the user’s identity will now have a single source of truth – the Identity Provider (idP). This simplifies identity management greatly, and makes it more secure by leveraging the idP’s strength – namely identity management. It also allows for more granular access management, and provides better integration amongst Cognite’s services.
What will be the practical consequences with respect to using CDF?
The main difference from a CDF user’s perspective will be that all access management will be handled from the idP instead of CDF. This means that there will no longer be service accounts or API keys in CDF. Groups will still be created in CDF to scope access rights, but will need to be linked to groups in the idP to provide access in CDF.
How will access be granted in CDF without API keys and service accounts?
For regular users who log in to CDF interactively on the web, the difference will be minimal. They will still log in using the current idP, and everything in CDF will be identical as long as their group membership is appropriate.
For service connections, the API key will need to be replaced by a service connection that is configured in the idP.
The migration is nothing to worry about with regards to access to CDF, since during the migration period, it will be possible to authenticate with both API keys and OIDC tokens.
What are the practical steps needed to migrate a CDF project to OIDC?
The rest of this guide will focus on in detail describing every step necessary to migrate a CDF project from legacy authentication to OIDC authentication. The idP chosen for this guide is Azure Active Directory (AAD).
Step 1: Collect information about the CDF project
Before anything can be configured in AAD, information about what to configure must be collected.
-
List CDF Groups. Each CDF group will need to be linked to a AAD group for them to provide any access in CDF. Therefore it is necessary to have a list of all the groups that will be needed in CDF after the migration.
Many CDF users use this task as an opportunity to simplify and declutter the CDF group structures which can often become complicated as use cases accumulate. -
List all active automatic extractors/solutions running custom code that use API keys, and their respective group memberships in CDF - these will need an application in AD to be able to continue to run automatically later.
-
List all users that have non-standard access, like admins, developers etc. and their group memberships.
-
List all Third party applications like Grafana, PowerBI, Azure Datafactory etc. used by your CDF project.
Now that this information is gathered, AAD configuration can start.
Step 2: Configure AAD Groups
First define the idP group -> CDF group relationships to create.
-
Each idP group can be linked to multiple CDF groups
-
Each CDF group can only be linked to 1 idP group

Follow the instructions given in the Cognite documentation on how to create these groups and link them to CDF groups.
Step 3: Create AAD Application registrations
These application registrations will fill the function of the old API keys. By assigning an application to a group for capabilities in CDF, and creating an application secret, applications can sign in to CDF without requiring any interactions like with legacy authentication.
To create an application registration, follow these steps:
-
Sign in to the Azure portal as an admin
-
Search for and select Azure Active Directory
-
Under Manage in the left hand menu, select App registrations
-
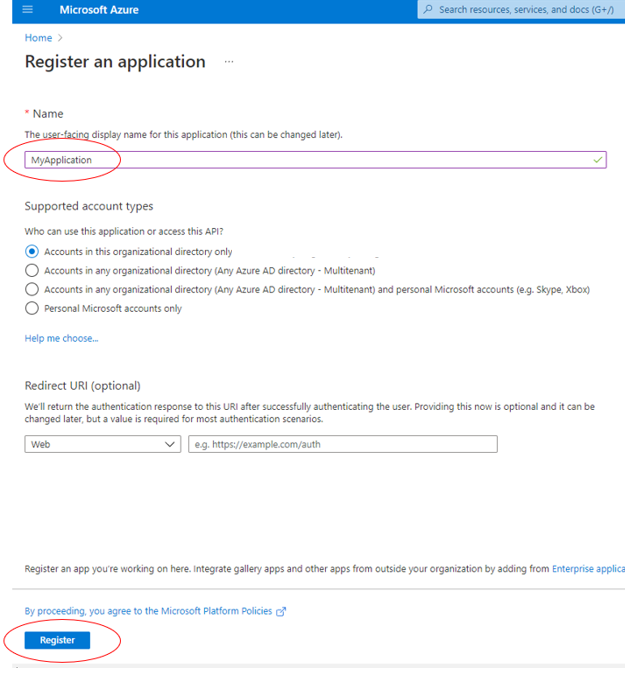
In the App registrations blade, select + New registration
-
In the Register Application dialogue, select an appropriate application name and click Register.
-
If the application is to be used for interactive logins by developers for instance, some additional settings are needed. If not, please skip to step 9. After registering the application, click Authentication in the main menu, then Add a platform, and select Mobile and desktop applications. Also make sure to set the Allow public client flows switch to yes.
-
In the Configure Desktop + devices blade, enter http://localhost in the Custom redirect URIs field and click Configure. After this step, the application is almost ready to be used as an interactive login application.
- If it is an interactive login application registration, skip the remaining steps of the application registration guide, and just make a note of the Application (client) ID.
If it is an automatic extractor that must work without any interaction, follow steps 9 and 10. -
Click Certificates & Secrets in the menu on the left
-
Create an application secret by clicking on New client secret and entering an appropriate description. The application (client) id, the application secret and the AAD tenant ID will be needed by the application/extractor that will be using the application registration to identify itself.


Step 4: Add users and applications to groups
To add users and applications to groups, follow these steps:
-
Sign in to the Azure portal as an admin
-
Search for and select Azure Active Directory
-
Under Manage in the left hand menu, select Groups
-
In the Groups blade, select the group to add users/apps to
-
In the Group blade, select Members
-
Click Add members and select users/applications from the blade on the right. Finish by clicking Select.


Step 5: Configure CDF for OIDC
NB! At this stage it is important to verify that the CDF admin is member of the AAD admin group, and that the AAD and CDF admin group(s) are linked, or there is a risk of being locked out of the CDF project at a later stage. The minimum capabilities needed in the admin group are:
- Groups: list, read, create, update, delete
- Projects: list, read, update
- Apikeys: list, read, create, update, delete
- Users: list, read, create, update, delete
-
Log in to CDF as an administrator
-
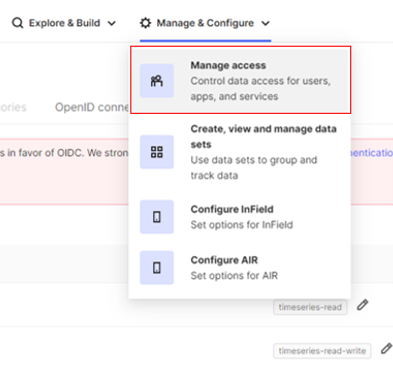
Navigate to Manage & Configure -> Manage access
-
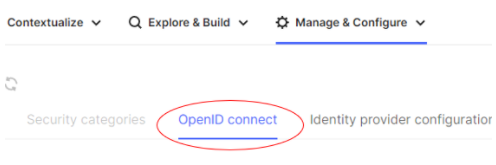
Click the OpenID connect tab
-
Fill out the fields as per the image below, substituting out AAD_TENANT_ID with your actual azure tenant id (format typically similar to: ff1fa35-3659-425b-8a9e-8899e56582a3) and CLUSTER_NAME with your actual cluster name. If you are unsure about what your cluster name is, contact Cognite support.

Step 6: Register CDF and any other core Cognite applications in AAD
In order for CDF to get group information from AAD, CDF needs to be registered as an Enterprise application in AAD. In order to do this, follow the instructions given in the official Cognite Documentation.
-
Follow the first steps to register CDF as an enterprise application
-
Follow the second set of instructions for any other core Cognite apps in use
Once these steps have been taken, log out of CDF and log in again, this time choosing Sign in with Microsoft.

You are now logged in using OIDC. This can be confirmed by checking that the red Deprecate Legacy Login no longer is grayed out on the Service accounts tab under Manage & Configure.
After this step, there will be an Enterprise application in AAD with the name Cognitedata API: CLUSTER_NAME. To complete configuring the interactive login application follow these steps:
-
Navigate to the interactive login application, and click API permissions in the main left-hand menu. Then click Add a permission.
-
Click the tab APIs my organization uses, and select the application that was registered with the admin login above. The below picture is illustrative, the selection should be the application relevant to the CDF project that was registered.
-
Click Delegated permissions, and tick off user_impersonation. Then click Add permissions.
-
Finally, click Grant admin consent for <organization>. The application can now be used for interactive login programmatically using only the client ID and tenant ID.


Step 7: Migrate all extractors & custom applications to OIDC
At this stage, all the necessary configurations should be made, and the remaining tasks are to migrate all API keys that are used by code running automatically. Individual developers that use the SDKs/API should use the interactive login method instead of service principals.
There are public repositories on Cognite’s github organization on how to authenticate in different ways using OIDC which are linked below.
Step 8: Disable legacy authentication
Once all known applications and users are logging in fine with OIDC, it’s time to deprecate legacy authentication. One way to do this with minimal disruption is to delete all the service accounts first, and check that this doesn’t cause any problems.
Disabling legacy is done by going to Manage & Configure -> Manage access in CDF as an administrator that is logged in using OIDC, and click the Deprecate Legacy Login button. This will trigger a popup box with a second button. Click the second button to disable legacy.

Conclusion
An OIDC migration consists of many little steps, and can be a daunting task at first. Hopefully with this detailed guide, migrating a CDF project using Azure as idP will be easier to execute, and the process somewhat demystified.