

 Check the
documentation
Check the
documentation Ask the
Community
Ask the
Community Take a look
at
Academy
Take a look
at
Academy Cognite
Status
Page
Cognite
Status
Page Contact
Cognite Support
Contact
Cognite Support


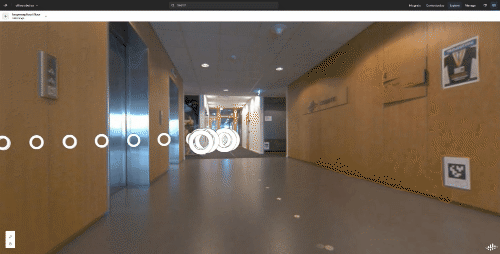
In order to have a updated view of your site, collecting three-sixty images can allow you to have a visual presence on your asset without having to be there. In this topic we would like to show and discuss how we collect three-sixty images using spot and transform them into a street view in fusion.
Following is the steps that are needed, in addition, if you have some cases where this could prove valuable, please share this as a comment bellow. The sequence of task is as folows:
- Print and Place Fiducials
Purpose
Fiducials are specially designed images, similar to QR codes, that Spot uses to match its internal map to the world around it. Fiducials are required at the beginning of every mission, and in order to make the Spot able to correct its position during a mission, it is nice to mount fiducials along the entire path of the mission. If possible, let Spot see one fiducial at every point during its route.
By default, Spot uses fiducial images of 146 mm x 146 mm square. If the printed size of your fiducials differs from this, you should set the size of your fiducials in the admin panel of your robot.
Configuring fiducial sizes and ranges
- Open the robot's admin console and navigate to the
Specify FiducialSize section of the General Settings page: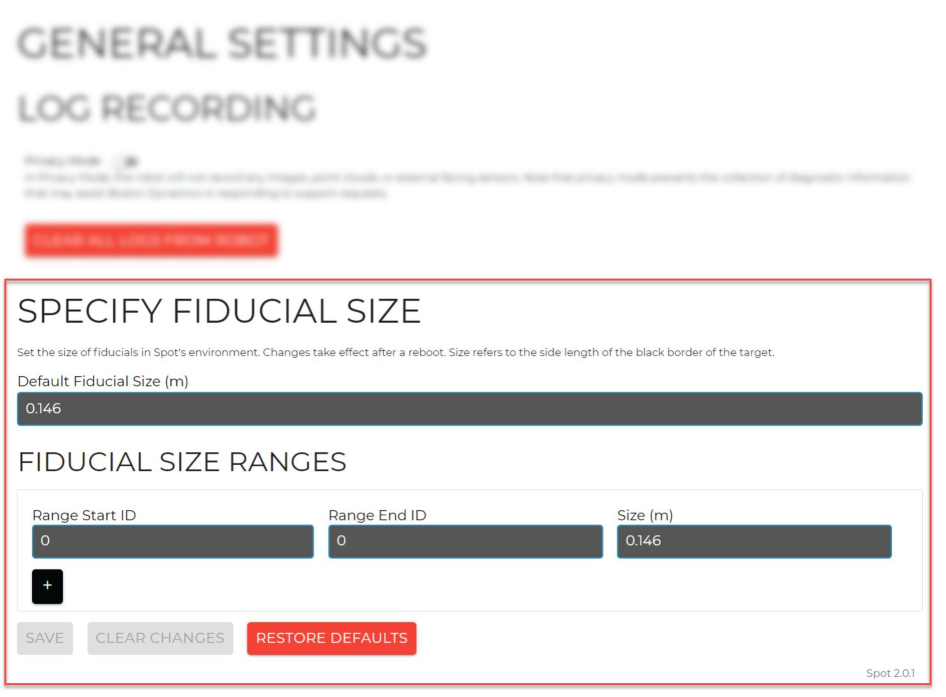
- Edit the start and end range fiducial IDs, if needed.
- Specify the default fiducial size in meters.
- Click Save and then reboot the robot to apply these changes.
NOTE: Areas with intersecting walls, corners, furniture, equipment, and other visually distinguishing features do not typically require a fiducial (unless the mission starts in that location).
Placing Fiducials
When placing fiducials, take note of the following:
- Place at least one at the mission’s starting location.
- The fiducials at the starting location should be at ground level.
- Tape fiducials flat against a vertical wall, as securely as possible. If fiducials move after recording, the mission may no longer replay.
- Place them low on the wall. The top of the fiducial image should be at human knee height, 45-60cm (18-24”) above the ground.
- Place them in a permanent location where they will persist for as long as you plan to replay the mission.
- Place them in areas which are feature deserts, for example a span of over 3m of featureless white wall.
- If you have glass walls present within the mission, it is advised to place fiducials on these walls. This will make sure that the robot does not walk into the glass. In any case, make sure to add some “features” to glass walls, such as tags, post-it notes, a4 sheets etc.
When placing fiducials, avoid the following:
- Repeating the same fiducial multiple times in a single mission. Each fiducial in a mission must be unique, however the same fiducial can be used in multiple missions.
- Placing fiducials in areas with inconsistent lighting. Shadowed or unevenly lit fiducials can have unreliable detections.
- Placing fiducials so that they are backlit by a bright background, such as on a window.
- Placing fiducials where they will be blocked, damaged, moved, or removed.
-
The fiducials at the starting location should be at ground level.
-
Tape fiducials flat against a vertical wall, as securely as possible. If fiducials move after recording, the mission may no longer replay.
-
Place them low on the wall. The top of the fiducial image should be at human knee height, 45-60cm (18-24”) above the ground.
-
Place them in a permanent location where they will persist for as long as you plan to replay the mission.
-
Place them in areas which are feature deserts, for example a span of over 3m of featureless white wall.
-
If you have glass walls present within the mission, it is advised to place fiducials on these walls. This will make sure that the robot does not walk into the glass. In any case, make sure to add some “features” to glass walls, such as tags, post-it notes, a4 sheets etc.
- To add another fiducial range and size configuration, click the plus sign.
- Open the robot's admin console and navigate to the
- Training a Robot Map and Uploading to Cognite Data Fusion (CDF)
Purpose
Before repeatable missions can be executed by SPOT, a Robot Map must first be trained. This Robot Map is to be trained via the SPOT Boston Dynamics pad/controller/tablet and uploaded to CDF. Future repeatable missions can be configured with contextualized data and actions and be repeatedly executed.
Notes
- This entire section is to be executed using the SPOT Boston Dynamics pad/controller/tablet.
- Test
Autowalkfunctionality by creating a sample mission before going on-site. - Do not pose SPOT while training the mission. Posing is not supported in InRobot, and it will be necessary to retrain the Robot Map.
- Cycle Power on SPOT at the start of the MAP. This resets internal counters for starting point / initial boot location.
- Maps should be trained so that the same fiducial is seen at the start and end of a Robot Map.
All Robot Maps must start at a fiducial.
Creating a Robot Map With a Docking Station in View
- From the tablet, tap
drivein the top left corner. SelectAutowalk. SelectRecordfrom the prompt and give the Robot Map a name when prompted - Select
Power on and Undockand allow the robot to undock. - Click
Start Recordingand begin the manual controlled walk of the desired Robot Map. - Press the red plus button and
dock and finish recording. Click the green docking fiducial to continue and confirmdock here.-
Caution: when recording or replaying map, maintain at least 2 meters safe distance from SPOT. Not only is following too closely behind SPOT potentially dangerous, it is also possible to inadvertently block sensor data from being recorded and may interfere with playback
-
Manually walk SPOT on the desired route through the environment by using the controller joysticks or Touch-to-go. To visit a very specific location in the route, manually rotate SPOT 90 degrees and back. This can be useful for gauge inspection routes. From this point forward, every movement made with SPOT will be recorded. The mission will be played back exactly as recorded during mission replay.
-
- Select
Drivefrom the top left, press the red(+), and presspower on and undock. Then we are able to press the(+)again andUpload Mission to CDF.
Training a Robot Map
The robot map for any mission must first be created using the Boston Dynamics Tablet. Before training a map be sure to cycle power on SPOT to avoid including any positional offset that has built up over time. All Robot Maps must start at a fiducial. It is recommended that maps are trained as loops so that the SPOT unit sees the same fiducial at the start and end of the mission.
Creating a Robot Map Without A Docking Station in View
- From the tablet, tap
drivein the top left corner. Select WalkAfrom the lower portion of the screen to begin manual control. Maneuver the robot using the manual controls to the starting fiducial of the Robot Map. - Tap the
Drivebutton again and selectAutowalkfrom the menu that appears. - From the tablet select
record. - When prompted give the
Autowalka name. This name should be meaningful to distinguish it from other Robot Maps and is what will be displayed by InRobot. - Tap
Start Recordingto start the recording process.-
Caution: when recording or replaying map, maintain at least 2 meters safe distance from SPOT. Not only is following too closely behind SPOT potentially dangerous, it is also possible to inadvertently block sensor data from being recorded and may interfere with playback
-
Manually walk SPOT on the desired route through the environment by using the controller joysticks or Touch-to-go. To visit a very specific location in the route, manually rotate SPOT 90 degrees and back. This can be useful for gauge inspection routes. From this point forward, every movement made with SPOT will be recorded. The mission will be played back exactly as recorded during mission replay.
-
- Press
Finish Recordingto save theAutowalk. - Return the tablet to
Drivein the upper left of the screen - Press the red
(+)in the lower right of the screen. SelectUpload Mission to CDF-
The Robot Map should now be uploaded to CDF and available in InRobot
-
- Find and run scan mission
visit the mission page of the robot:
And find ans search for the map name you created:

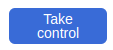
and select the RobotMapName Scan Mission. Take control of the robot:
Pres the run mission, and see the robot collect a scan

- Review scan in Cognite Data Fusion UI
Visit fusion, and data explorer. For details visit this page
enter Data Explorer, under Explore and Build
And visit the 3D tab

In the search bar search for your map name, and clike. you are now inside the street view.