

 Check the
documentation
Check the
documentation Ask the
Community
Ask the
Community Take a look
at
Academy
Take a look
at
Academy Cognite
Status
Page
Cognite
Status
Page Contact
Cognite Support
Contact
Cognite Support

MQTT is one of the standards for IoT communication in the industry. It is a lightweight, publish-subscribe, machine to machine network protocol for message queue/message queuing service. As it is widely used, it made sense to have a dedicated extractor for that protocol. At Cognite, we have a hosted extractor for MQTT, that facilitates the extraction of data from a broker. “Hosted” means it runs on our infrastructure and you don’t have to deploy anything on yours to extract data: you just have to configure it.
In this article, we will see how to configure and use it. An example scenario involving MQTT could be sensors installed on industrial machines publishing timeseries data like temperature, pression etc., to a broker. Data would be published to different topics. When extracting data from the broker, with the Cognite extractor, we can have different behaviors based on the topic.
Here, we will publish data to four different topics, on an MQTT broker. Those topics are named as follows:
{{YOUR GUID}}/machine1/temperature
{{YOUR GUID}}/machine1/pression
{{YOUR GUID}}/machine2/temperature
{{YOUR GUID}}/machine2/pression
Since we are using a public MQTT broker, we will prefix topics with a GUID (Globally Unique Identifier), for you to have your own topics to publish and subscribe to. Make sure to use the same GUID in your different scripts and in CDF.
Warning: this is a public broker, do not publish any confidential or personal information on it since it could be read by other people.
In our case, we simulate temperature and pressure data coming from two machines. The goal is to configure the extractor so it extracts data from all the topics to CDF timeseries.
The messages published to those topics will look like the following:
{

  “value”: {{value as integer}},

  “timestamp”: {{current_timestamp as unix timestamp (ms)}}

}
Please mind that this is a simplified and sample design, the purpose of this article is only to understand how to use our extractor. Also, authentication and encryption should be used according to your security standards.
To publish to those topics, we will simply use the script below to send sample data. It simply creates sample data and publishes it to each topic every second.
import paho.mqtt.client as paho

HOST = "test.mosquitto.org"
GUID = "abcd-1234-pppp-aaaa"
MACHINE1_TEMP_TOPIC = f"{GUID}/machine1/temperature"
MACHINE1_PRES_TOPIC = f"{GUID}/machine1/pressure"
MACHINE2_TEMP_TOPIC = f"{GUID}/machine2/temperature"
MACHINE2_PRES_TOPIC = f"{GUID}/machine2/pressure"
TOPIC = "python/mqtt/a"


def on_connect(client, userdata, flags, rc):
    print("CONNACK received with code %d." % (rc))


client_id = f"python-mqtt-{random.randint(0, 1000)}"
client = paho.Client(client_id=client_id)
client.on_connect = on_connect
client.connect(HOST, 1883)
client.loop_start()

while True:
    client.publish(
        topic=MACHINE1_TEMP_TOPIC,
        payload=json.dumps(
            {"value": 0.0 + random.uniform(-1, 1), "timestamp": int(time.time() * 1000)}
        ),
    )
    client.publish(
        topic=MACHINE2_TEMP_TOPIC,
        payload=json.dumps(
            {
                "value": 12.0 + random.uniform(-3, 3),
                "timestamp": int(time.time() * 1000),
            }
        ),
    )
    client.publish(
        topic=MACHINE1_PRES_TOPIC,
        payload=json.dumps(
            {
                "value": 3.0 + random.uniform(-0.5, 0.5),
                "timestamp": int(time.time() * 1000),
            }
        ),
    )
    client.publish(
        topic=MACHINE2_PRES_TOPIC,
        payload=json.dumps(
            {
                "value": 10.0 + random.uniform(-0.5, 0.5),
                "timestamp": int(time.time() * 1000),
            }
        ),
    )
    time.sleep(1)
We can quickly check with python that we can subscribe to topics and retrieve data:
HOST = "test.mosquitto.org"
GUID = "abcd-1234-pppp-aaaa"


def on_connect(client, userdata, flags, rc):
    print("CONNACK received with code %d." % (rc))


def on_subscribe(client, userdata, mid, granted_qos):
    print("Subscribed: " + str(mid) + " " + str(granted_qos))


def on_message(client, userdata, msg):
    print(f"Received `{msg.payload.decode()}` from `{msg.topic}` topic")


client_id = f"python-mqtt-{random.randint(0, 1000)}"
client = paho.Client(client_id=client_id)
client.on_connect = on_connect
client.on_subscribe = on_subscribe
client.on_message = on_message
client.connect(HOST, 1883)
client.subscribe(f"{GUID}/#")


client.loop_forever()
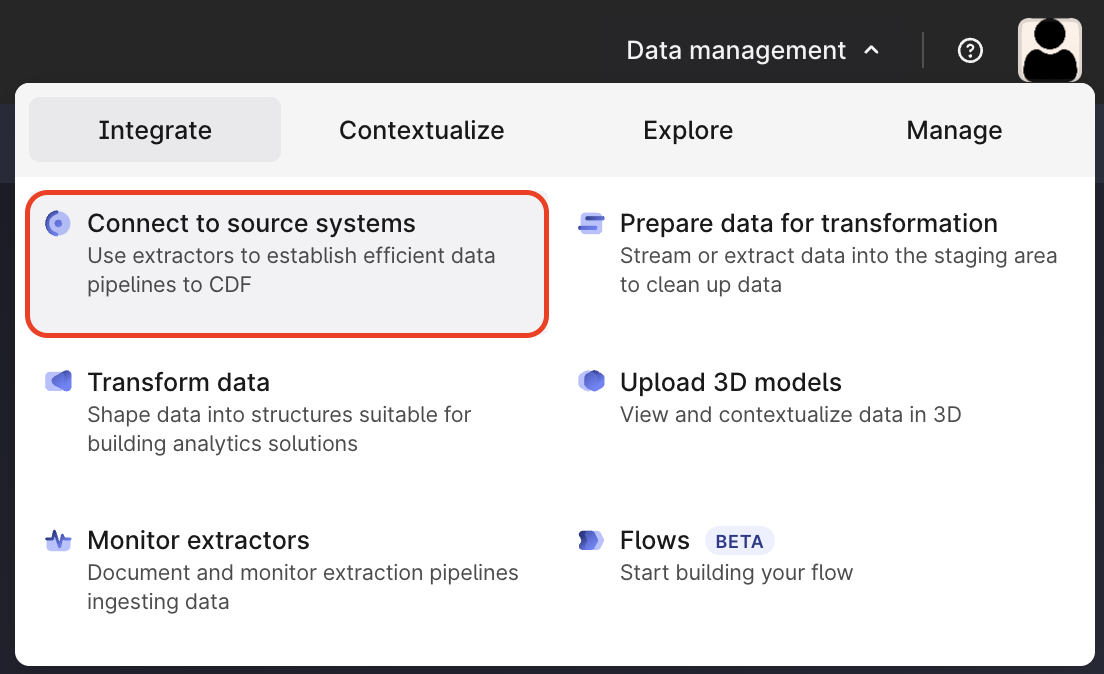
Now let’s set up the extractor in CDF. Navigate to “Data Management > Integrate > Connect to source systems”.
Search “MQTT” and select “Cognite MQTT Extractor”.
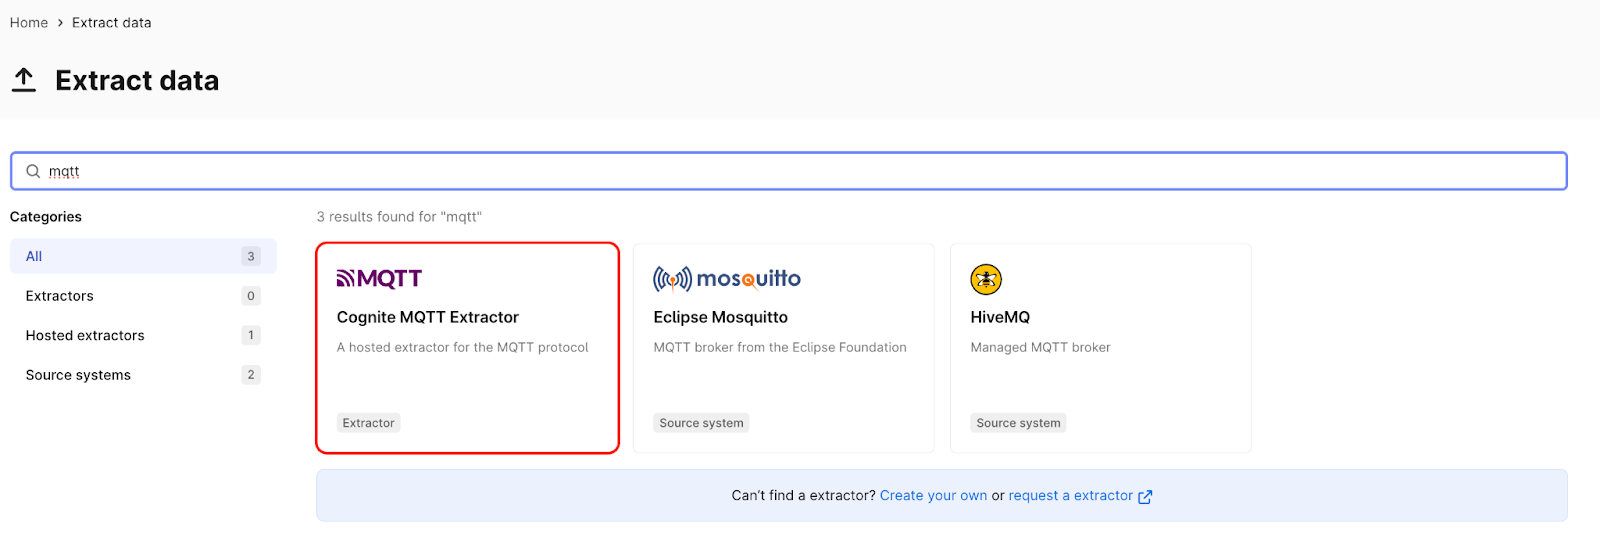
Then click on “Set up extractor”.
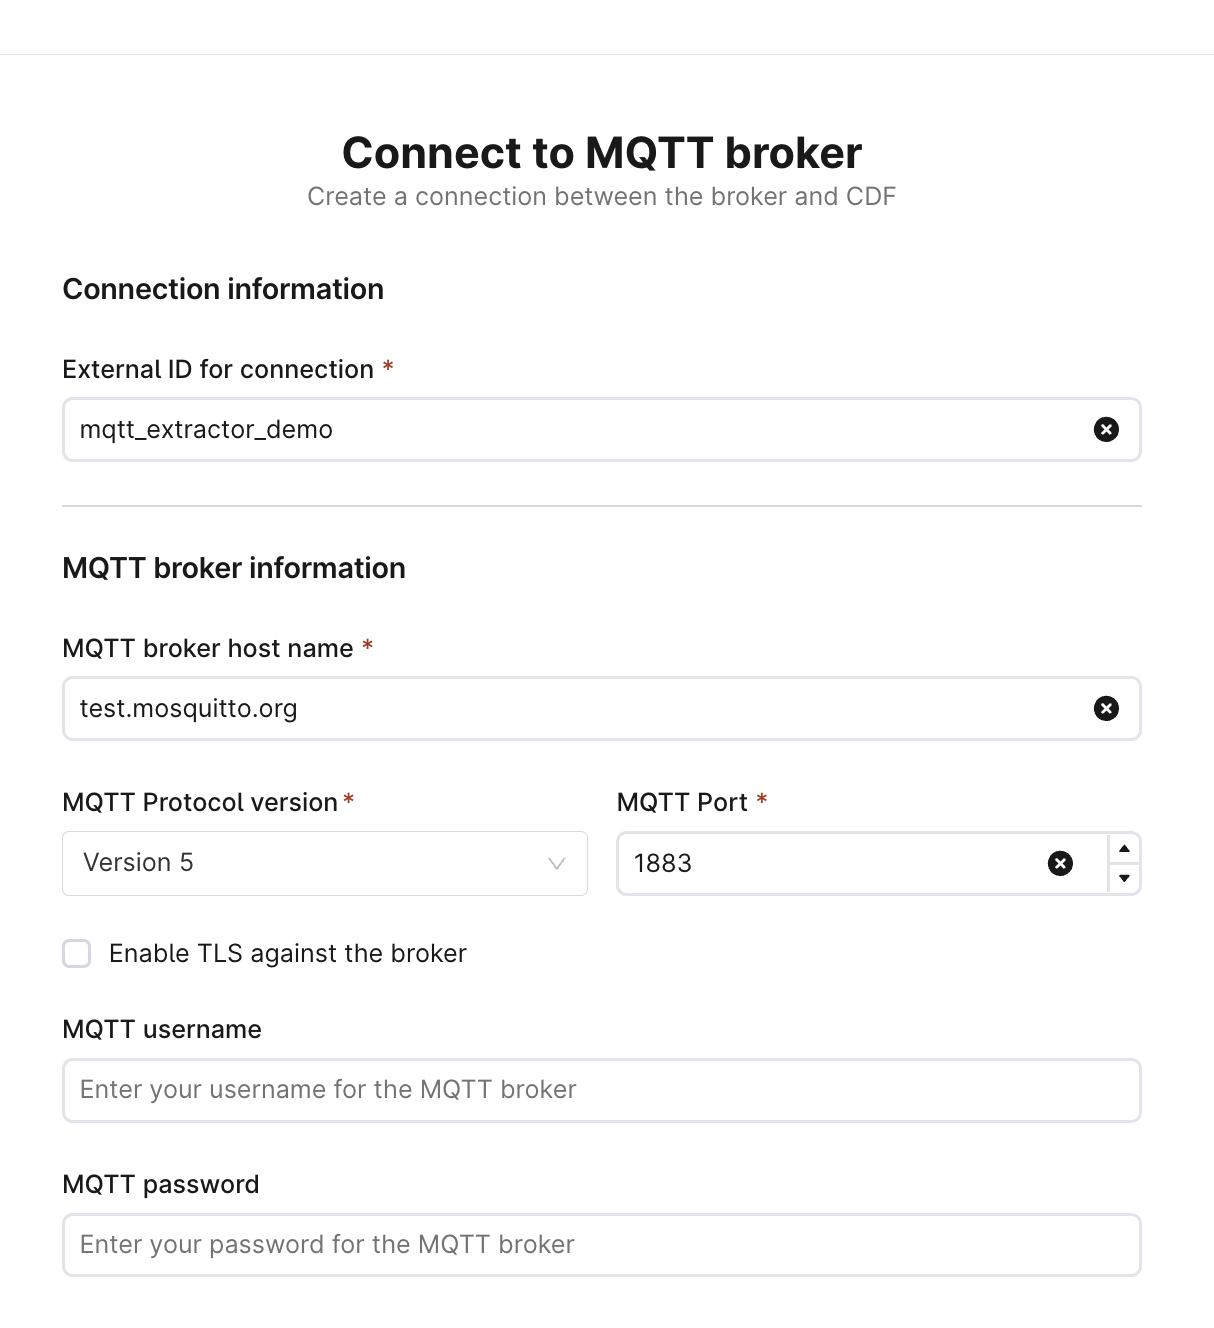
Enter the details displayed above and click on “Create connection”.
When using a private broker, you just need to configure the authentication details as explained in the set up flow.
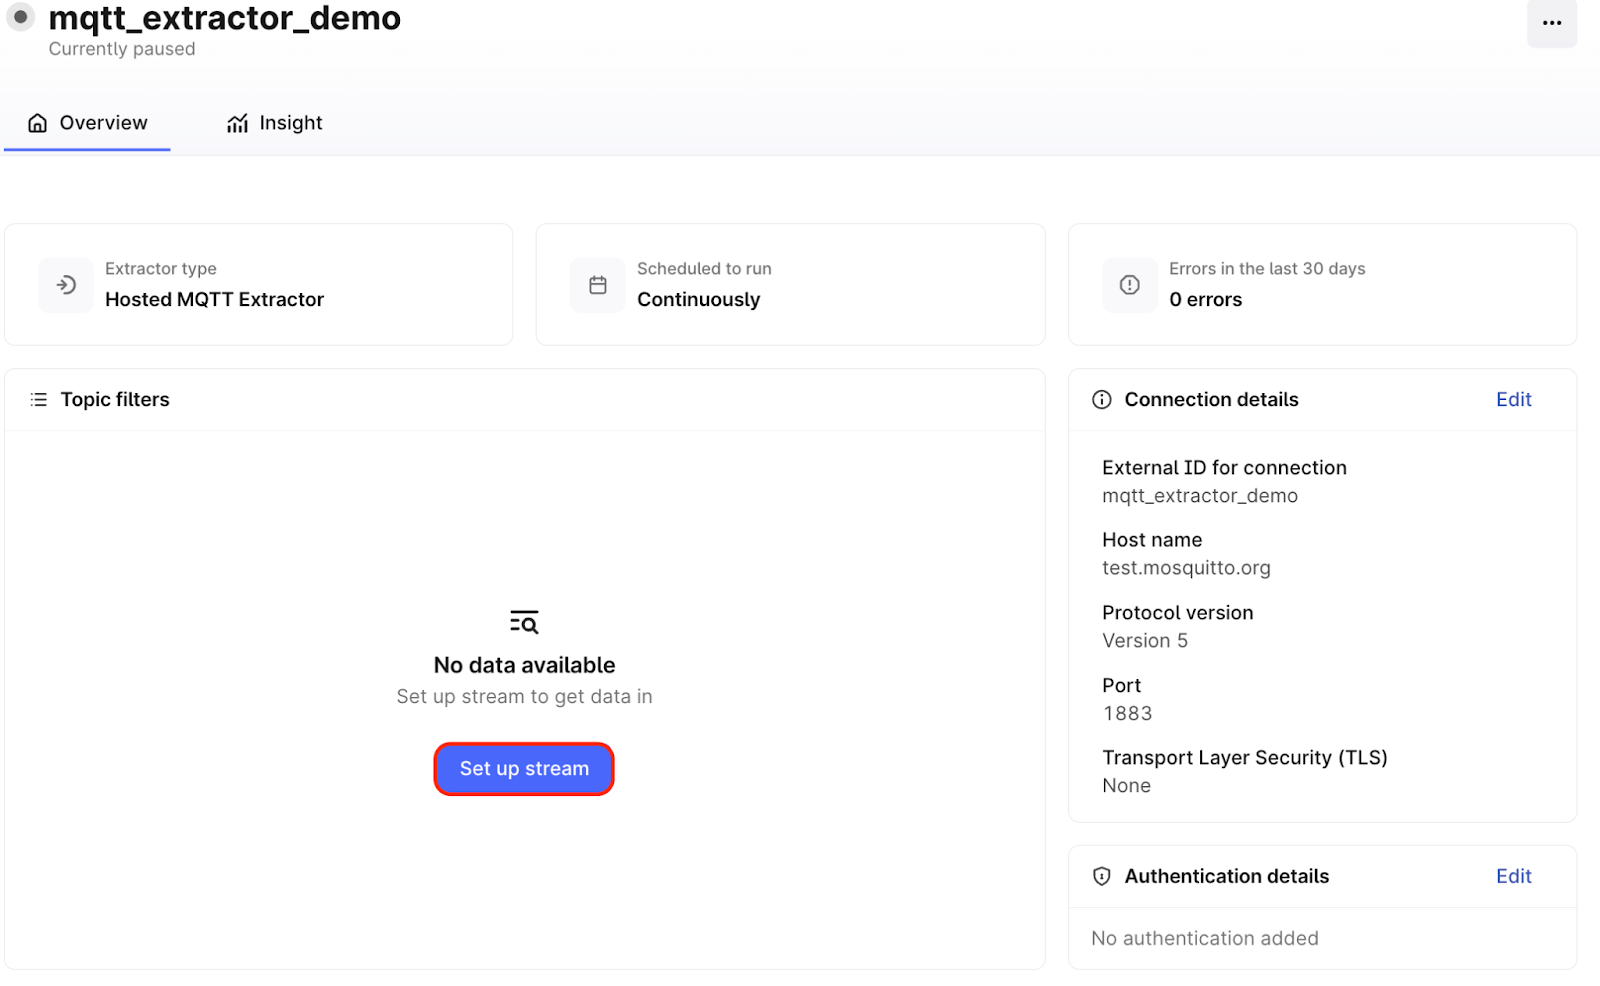
The connection is now set up. We now need to set up streams, to actually get data from the broker. Click on “Set up stream”.
The first step consists of filtering topics. You can have a look at the set up guide on the right side of the screen to have a better understanding of the filters. In our case, we want to select all the topics we created during this example, we can then use the following filter: {{GUID}}/#
# is a wildcard, the filter will select every topic that starts with your GUID.
The second step is to select or create a message format: we need to specify a mapping between the message gotten form the topic and CDF. You can either choose between some standards, available by default on CDF, or create your own custom format. It is advised to have a look at the setup guide as well. In our case, we’ll choose the second option, custom format. You can tick the “Try with sample data” checkbox: that allows to use some sample data and check that your custom message format parses the data as expected (cf. “Sample result” section).
In our case, we want to create time series datapoints for every message retrieved. Each topic will have its own timeseries: we set it up with the externalId property of the transformation code. Each datapoint will have the value and the timestamp of the corresponding message. In our python code, we format the timestamp directly to UNIX, we could also do that in the transformation code as well, with the to_unix_timestamp function.
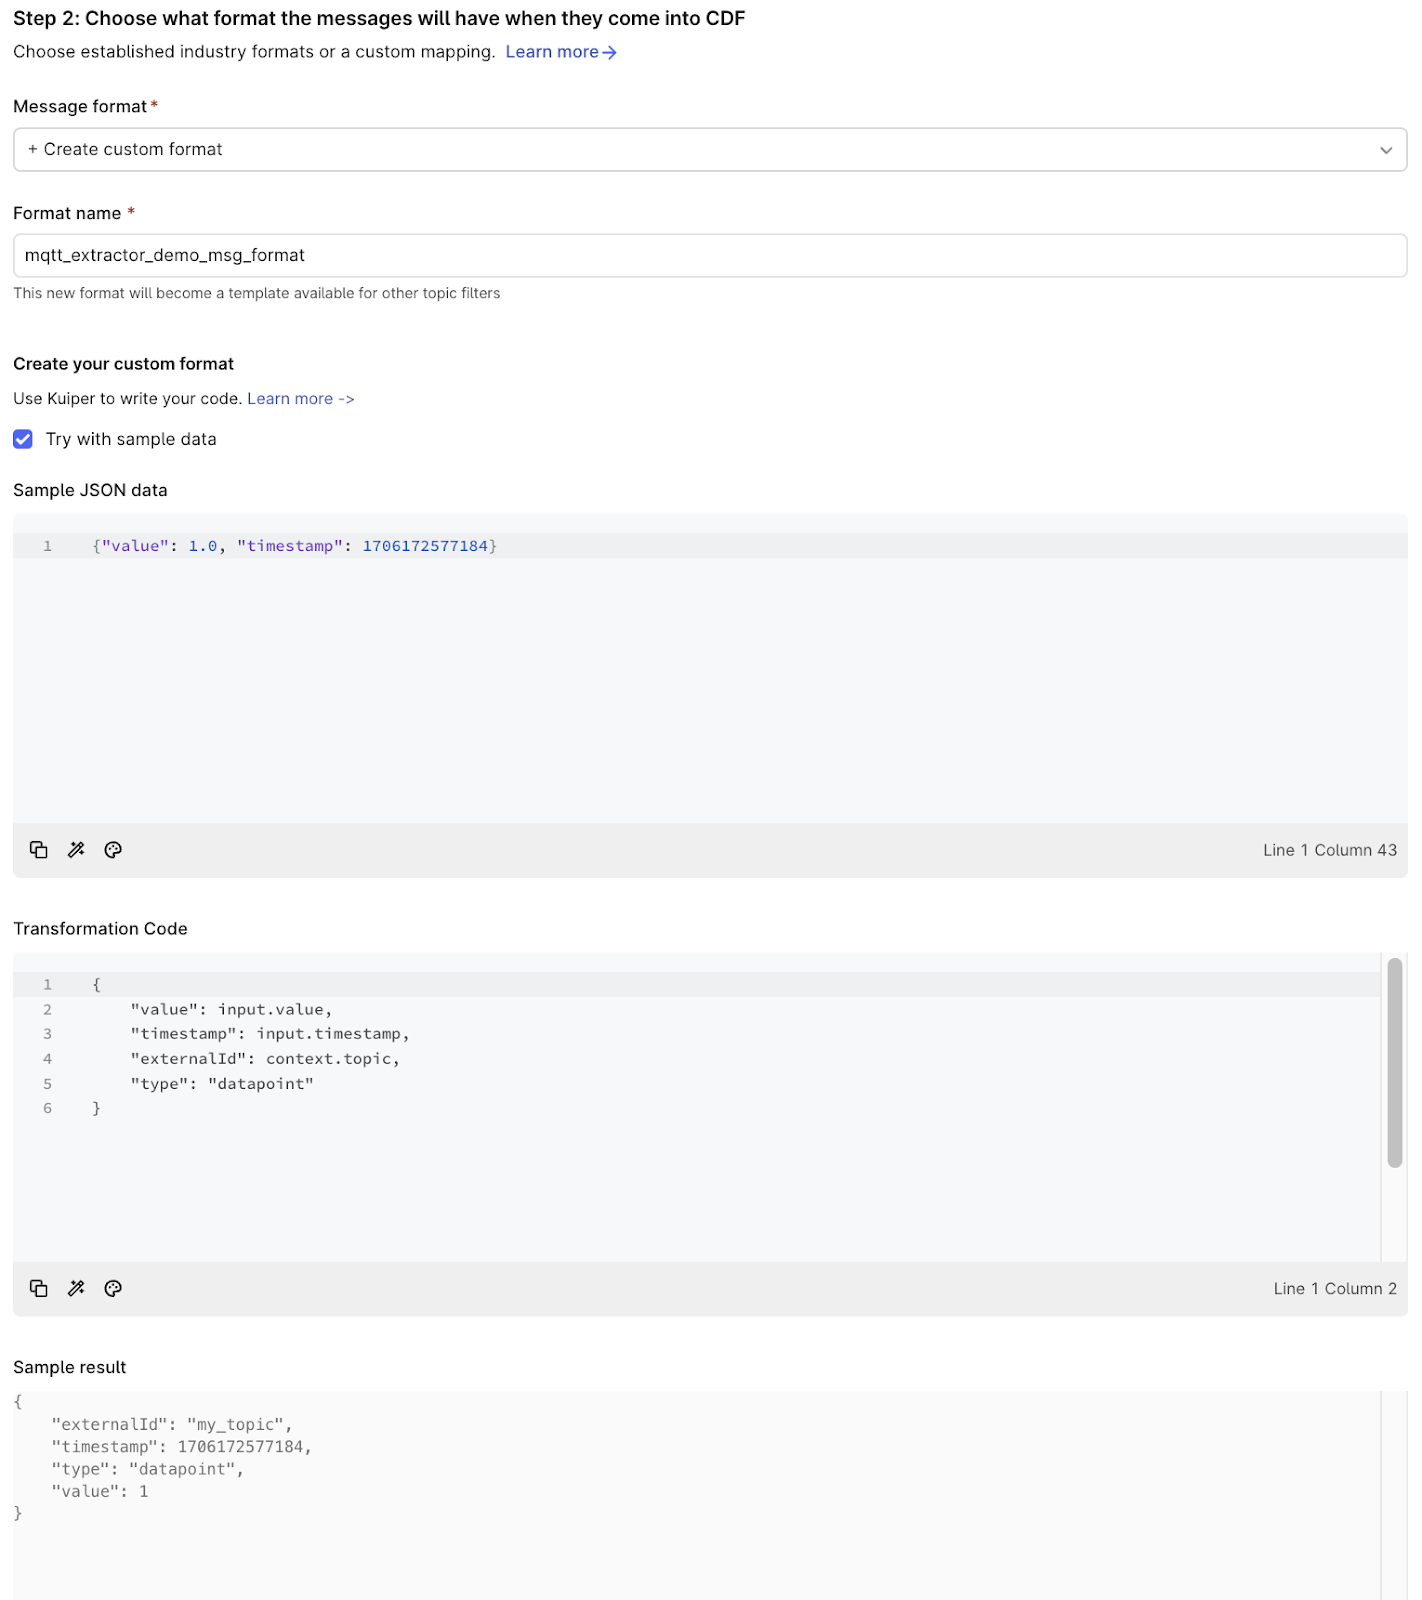
We usually recommend using one topic filter for all the topics that share the same schema.
Step 3 consists of selecting a sink (either to create one or to select an existing one). A sink corresponds to a set of credentials that is used to create resources in CDF. During this example, we’ll create a new sink as current user and set its external ID to “mqtt_extractor_demo”. That means that the sink will use the user’s credentials to push data to CDF. In production, you would likely use a sink with client credentials.
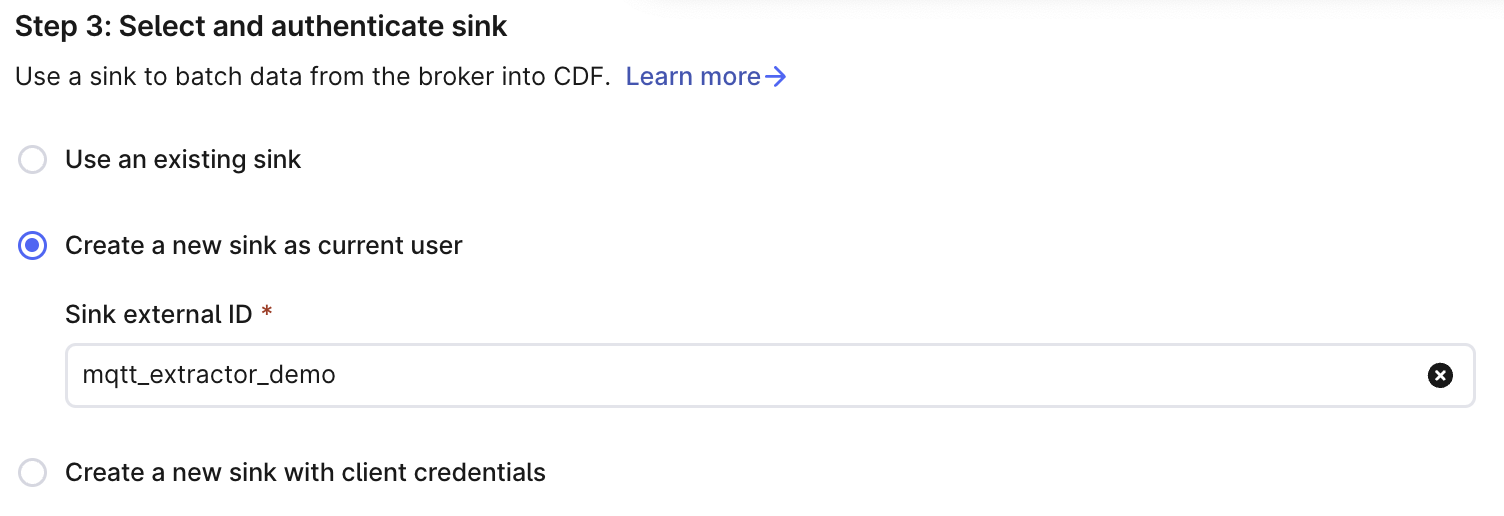
You can now click on “Done” at the bottom of the page to create the data stream.
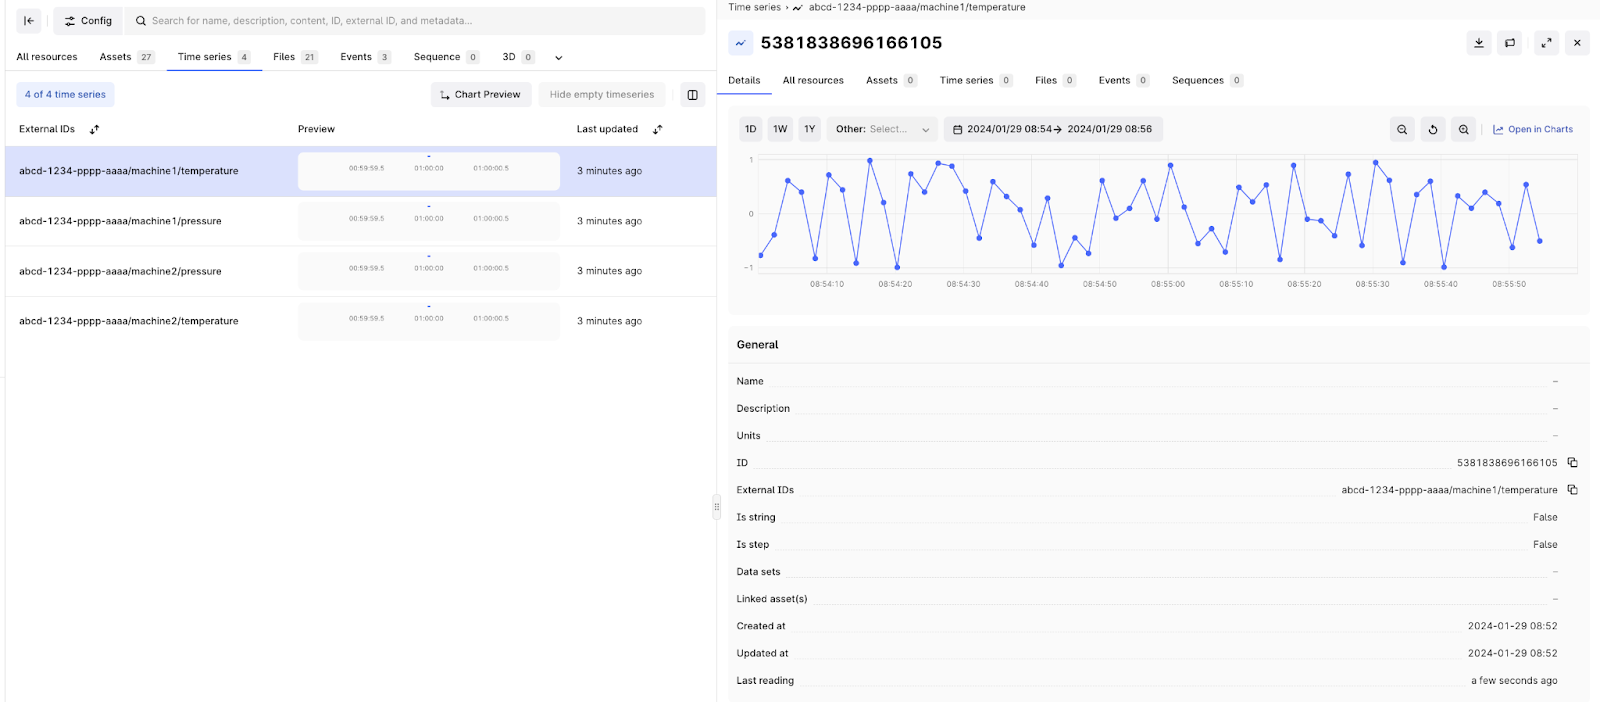
Make sure you have messages published to your topics and wait for the topic filter to have “running” status. Then you can go to time series and see the time series (and their datapoints) that were created by the MQTT extractor.

Then you should be able to see the time series created by the extractor in the Data explorer. You can also see that they contain data as expected.
It is also possible to handle more complex use-cases with message formats. For example, if you wanted to push messages’ values to different time series based on another message property, you could do that.
If you had only two topics, one for each machine, and the metric (temperature or pressure) would be a message attribute. The messages would look like:
{

  “value”: {{value as integer}},

  “metric”: {{“temperature” or “pressure”}}

  “timestamp”: {{current_timestamp as unix timestamp (ms)}}

}
You could then use this metric attribute in the message format to split the topic messages into two timeseries: one for temperature and one for pressure. The message format would look like the following:
{
   "value": input.value,

   "timestamp": input.timestamp,

   "externalId": concat(context.topic, "_", input.metric),

   "type": "datapoint"

}
It is also possible to handle messages consisting of a list of values like below.
{

  “sensorData”:

    [

      “value”: {{value as integer}},

      “timestamp”: {{current_timestamp as unix timestamp (ms)}},

      … ,

      “value”: {{value as integer}},

      “timestamp”: {{current_timestamp as unix timestamp (ms)}}

    ]
}
For that kind of use case, you would use the map function, to apply the formatting to every value. You could for example use the following message format. It would create a time series with external ID as the topic name, value and timestamp from each of the sensorData list items,
input.sensorData.map(
  item => {

    "value": item.value,

    "timestamp": item.timestamp,

    "externalId": context.topic,

    "type": "datapoint"

  }

)
Thanks to